Virtual Keyboard is an On-Screen Keyboard in Silverlight with support for Copying the input to the Clipboard which can then be Pasted into another application.
Printer Friendly Download Tutorial (305KB) Download Source Code (7.59KB) Online Demonstration
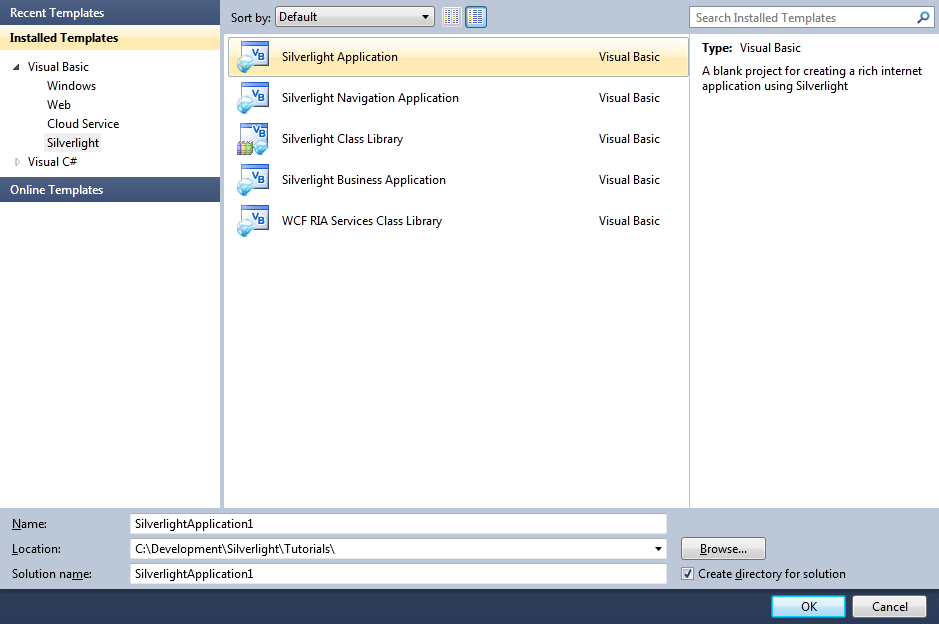
Step 1
Start Microsoft Visual Web Developer 2010 Express, then Select File then New Project... Select "Visual Basic" then "Silverlight Application" from Templates, select a Location if you wish, then enter a name for the Project and then click OK, see below:
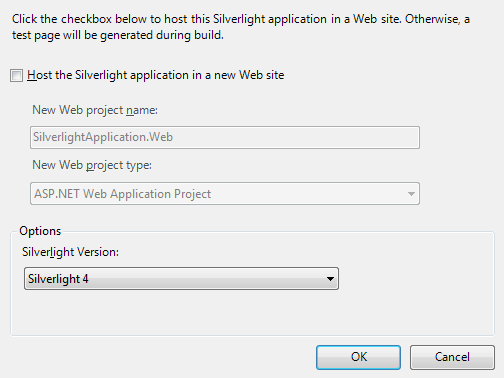
Step 2
New Silverlight Application window should appear, uncheck the box "Host the Silverlight Application in a new Web site" and then select the required Silverlight Version, see below:
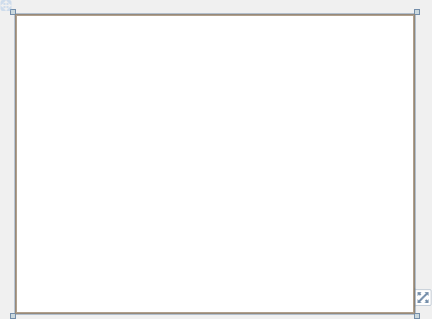
Step 3
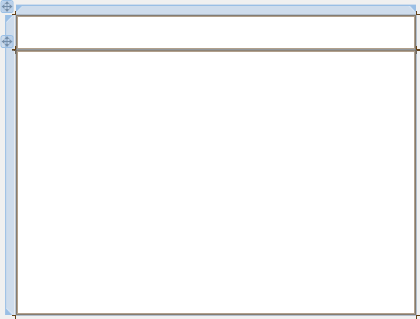
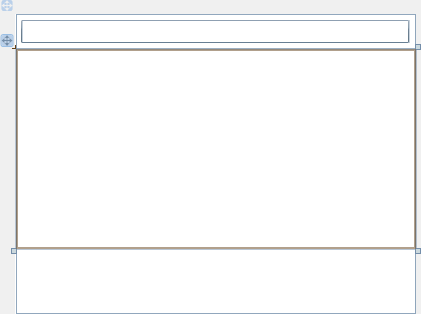
A Blank Page named MainPage.xaml should then appear, see below:
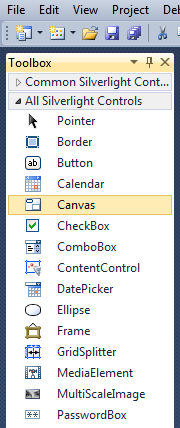
Step 4
Then from the All Silverlight Controls section in the Toolbox select the Canvas control:
Step 5
Draw a Two Canvases on the Page then in the XAML Pane above the "</Grid>" then change the "<Canvas>" lines to the following:
<Canvas Height="35" Width="400" VerticalAlignment="Top" HorizontalAlignment="Left" Name="Toolbar"></Canvas>
<Canvas Height="265" Width="400" Margin="0,35,0,0" VerticalAlignment="Top" HorizontalAlignment="Left" Name="Content"></Canvas>
See below:
Step 6
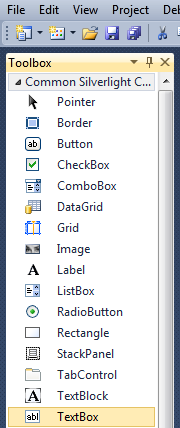
Then from the Common Silverlight Controls section in the Toolbox select the TextBox control:
Step 7
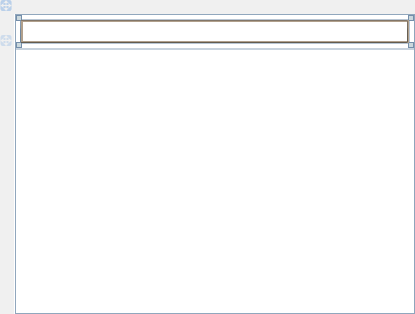
Draw a TextBox on the "Toolbar" Canvas and in the XAML Pane below the "<Canvas>" tag and above the "</Canvas>" change "TextBox1" to the following:
<TextBox Canvas.Left="6" Canvas.Top="6" Height="23" Width="388" Name="Buffer"/>
See below:
Step 8
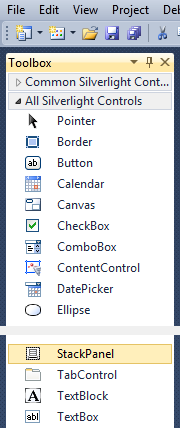
Then from the All Silverlight Controls section in the Toolbox select the StackPanel control:
Step 9
Draw a StackPanel on the large "Content" Canvas by dragging the StackPanel from the Toolbox onto the Canvas then in the XAML Pane inbetween the "<Canvas>" and "</Canvas>" tags change the "<StackPanel>" line to the following:
<StackPanel Height="200" Width="400" Name="Keyboard"/>
See below:
Step 10
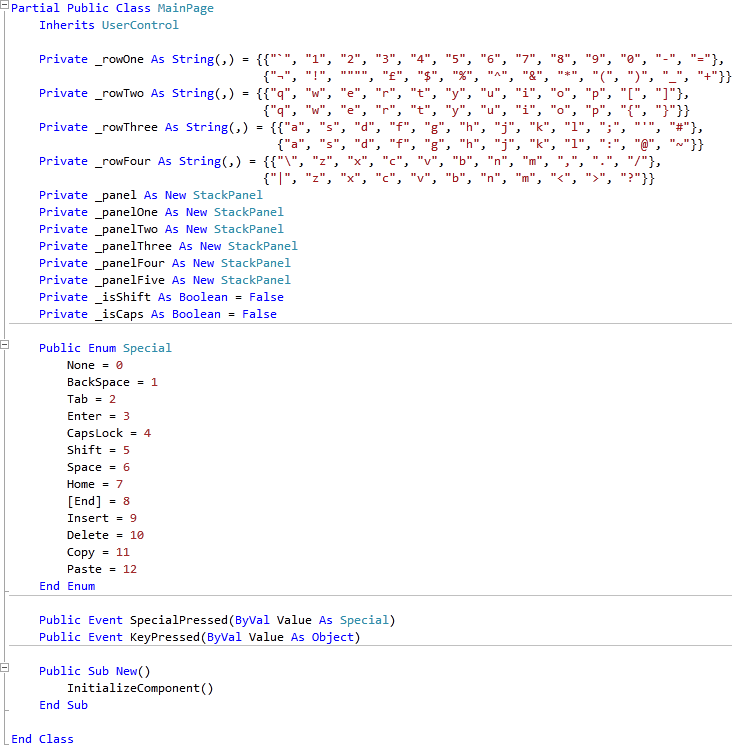
Right Click on the Page or the entry for "MainPage.xaml" in Solution Explorer and choose the "View Code" option. In the Code View below the "Inherits UserControl" line type the following:
Private _rowOne As String(,) = {{"`", "1", "2", "3", "4", "5", "6", "7", "8", "9", "0", "-", "="},
    {"¬", "!", """", "£", "$", "%", "^", "&", "*", "(", ")", "_", "+"}}
Private _rowTwo As String(,) = {{"q", "w", "e", "r", "t", "y", "u", "i", "o", "p", "[", "]"},
    {"q", "w", "e", "r", "t", "y", "u", "i", "o", "p", "{", "}"}}
Private _rowThree As String(,) = {{"a", "s", "d", "f", "g", "h", "j", "k", "l", ";", "'", "#"},
    {"a", "s", "d", "f", "g", "h", "j", "k", "l", ":", "@", "~"}}
Private _rowFour As String(,) = {{"\", "z", "x", "c", "v", "b", "n", "m", ",", ".", "/"},
    {"|", "z", "x", "c", "v", "b", "n", "m", "<", ">", "?"}}
Private _panel As New StackPanel
Private _panelOne As New StackPanel
Private _panelTwo As New StackPanel
Private _panelThree As New StackPanel
Private _panelFour As New StackPanel
Private _panelFive As New StackPanel
Private _isShift As Boolean = False
Private _isCaps As Boolean = False

Public Enum Special
  None = 0
  BackSpace = 1
  Tab = 2
  Enter = 3
  CapsLock = 4
  Shift = 5
  Space = 6
  Home = 7
  [End] = 8
  Insert = 9
  Delete = 10
  Copy = 11
  Paste = 12
End Enum

Public Event SpecialPressed(ByVal Value As Special)
Public Event KeyPressed(ByVal Value As Object)
See Below:
Step 11
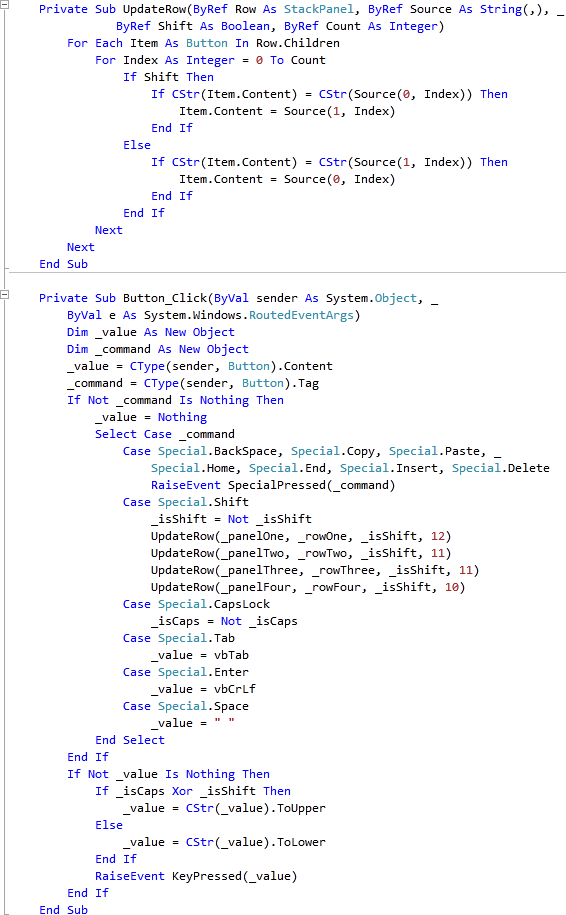
While still in the Code View for MainPage.xaml, below the "End Sub" for "Public Sub New()" type the following Subs:
Private Sub UpdateRow(ByRef Row As StackPanel, ByRef Source As String(,), _
    ByRef Shift As Boolean, ByRef Count As Integer)
  For Each Item As Button In Row.Children
    For Index As Integer = 0 To Count
      If Shift Then
        If CStr(Item.Content) = CStr(Source(0, Index)) Then
          Item.Content = Source(1, Index)
        End If
      Else
        If CStr(Item.Content) = CStr(Source(1, Index)) Then
          Item.Content = Source(0, Index)
        End If
      End If
    Next
  Next
End Sub

Private Sub Button_Click(ByVal sender As System.Object, _
    ByVal e As System.Windows.RoutedEventArgs)
  Dim _value As New Object
  Dim _command As New Object
  _value = CType(sender, Button).Content
  _command = CType(sender, Button).Tag
  If Not _command Is Nothing Then
    _value = Nothing
    Select Case _command
      Case Special.BackSpace, Special.Copy, Special.Paste, _
          Special.Home, Special.End, Special.Insert, Special.Delete
        RaiseEvent SpecialPressed(_command)
      Case Special.Shift
        _isShift = Not _isShift
        UpdateRow(_panelOne, _rowOne, _isShift, 12)
        UpdateRow(_panelTwo, _rowTwo, _isShift, 11)
        UpdateRow(_panelThree, _rowThree, _isShift, 11)
        UpdateRow(_panelFour, _rowFour, _isShift, 10)
      Case Special.CapsLock
        _isCaps = Not _isCaps
      Case Special.Tab
        _value = vbTab
      Case Special.Enter
        _value = vbCrLf
      Case Special.Space
        _value = " "
    End Select
  End If
  If Not _value Is Nothing Then
    If _isCaps Xor _isShift Then
      _value = CStr(_value).ToUpper
    Else
      _value = CStr(_value).ToLower
    End If
    RaiseEvent KeyPressed(_value)
  End If
End Sub
See Below:
Step 12
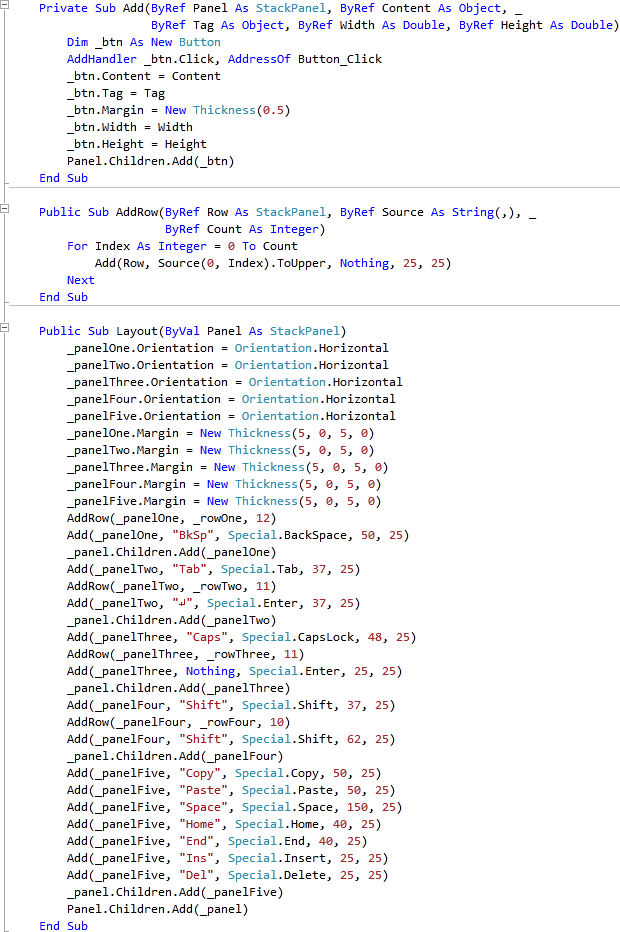
While still in the Code View for MainPage.xaml, below the "End Sub" for "Private Sub Button_Click(...)" type the following Subs:
Private Sub Add(ByRef Panel As StackPanel, ByRef Content As Object, _
    ByRef Tag As Object, ByRef Width As Double, ByRef Height As Double)
  Dim _btn As New Button
  AddHandler _btn.Click, AddressOf Button_Click
  _btn.Content = Content
  _btn.Tag = Tag
  _btn.Margin = New Thickness(0.5)
  _btn.Width = Width
  _btn.Height = Height
  Panel.Children.Add(_btn)
End Sub

Public Sub AddRow(ByRef Row As StackPanel, ByRef Source As String(,), _
    ByRef Count As Integer)
  For Index As Integer = 0 To Count
    Add(Row, Source(0, Index).ToUpper, Nothing, 25, 25)
  Next
End Sub

Public Sub Layout(ByVal Panel As StackPanel)
  _panelOne.Orientation = Orientation.Horizontal
  _panelTwo.Orientation = Orientation.Horizontal
  _panelThree.Orientation = Orientation.Horizontal
  _panelFour.Orientation = Orientation.Horizontal
  _panelFive.Orientation = Orientation.Horizontal
  _panelOne.Margin = New Thickness(5, 0, 5, 0)
  _panelTwo.Margin = New Thickness(5, 0, 5, 0)
  _panelThree.Margin = New Thickness(5, 0, 5, 0)
  _panelFour.Margin = New Thickness(5, 0, 5, 0)
  _panelFive.Margin = New Thickness(5, 0, 5, 0)
  AddRow(_panelOne, _rowOne, 12)
  Add(_panelOne, "BkSp", Special.BackSpace, 50, 25)
  _panel.Children.Add(_panelOne)
  Add(_panelTwo, "Tab", Special.Tab, 37, 25)
  AddRow(_panelTwo, _rowTwo, 11)
  Add(_panelTwo, "↵", Special.Enter, 37, 25)
  _panel.Children.Add(_panelTwo)
  Add(_panelThree, "Caps", Special.CapsLock, 48, 25)
  AddRow(_panelThree, _rowThree, 11)
  Add(_panelThree, Nothing, Special.Enter, 25, 25)
  _panel.Children.Add(_panelThree)
  Add(_panelFour, "Shift", Special.Shift, 37, 25)
  AddRow(_panelFour, _rowFour, 10)
  Add(_panelFour, "Shift", Special.Shift, 62, 25)
  _panel.Children.Add(_panelFour)
  Add(_panelFive, "Copy", Special.Copy, 50, 25)
  Add(_panelFive, "Paste", Special.Paste, 50, 25)
  Add(_panelFive, "Space", Special.Space, 150, 25)
  Add(_panelFive, "Home", Special.Home, 40, 25)
  Add(_panelFive, "End", Special.End, 40, 25)
  Add(_panelFive, "Ins", Special.Insert, 25, 25)
  Add(_panelFive, "Del", Special.Delete, 25, 25)
  _panel.Children.Add(_panelFive)
  Panel.Children.Add(_panel)
End Sub
See Below:
Step 13
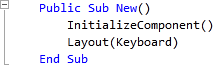
While still in the Code View, in the "Public Sub New()" constructor below the "InitializeComponent()" line type the following:
Layout(Keyboard)
See Below:
Step 14
While still in the Code View, below the "End Sub" for "Public Sub New()" Constructor type the following Event Handler Subs:
Private Sub Button_SpecialPressed(ByVal Value As Special) _
    Handles Me.SpecialPressed
  Buffer.Focus()
  Select Case Value
    Case Special.BackSpace
      If Not Buffer.SelectionStart = 0 Then
        Buffer.Select(Buffer.SelectionStart - 1, 1)
        Buffer.SelectedText = ""
      End If
    Case Special.Home
      Buffer.SelectionStart = 0
    Case Special.End
      Buffer.SelectionStart = Buffer.Text.Length
    Case Special.Delete
      If Not Buffer.SelectionStart = Buffer.Text.Length Then
        Buffer.Select(Buffer.SelectionStart, 1)
        Buffer.SelectedText = ""
      End If
    Case Special.Copy
      If Buffer.Text.Length > 0 Then
        Clipboard.SetText(Buffer.Text)
      End If
    Case Special.Paste
      If Not Buffer.SelectionStart = 0 Then
        Buffer.SelectedText = Clipboard.GetText
      End If
  End Select
End Sub

Private Sub Button_KeyPressed(ByVal Value As Object) _
    Handles Me.KeyPressed
  Buffer.Focus()
  Buffer.SelectedText = Value
End Sub
See Below:

Step 15
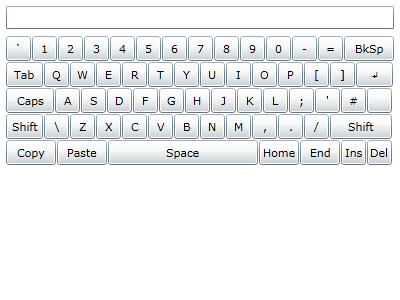
Save the Project as you have now finished the Silverlight application. Select Debug then Start Debugging or click on Start Debugging:
After you do, the following will appear in a new Web Browser window:
Step 16
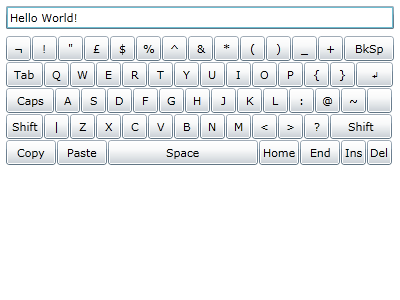
You can Click on any of the Buttons to add that Character to the Buffer TextBox, plus you can use Shift and Caps Lock, just like a real Keyboard, see below:
Step 17
Close the Application and Browser window by clicking on the Close Button ![]() on
the top right of the Application Window and Web Browser to Stop the application.
on
the top right of the Application Window and Web Browser to Stop the application.
This was a simple Virtual Keyboard showing how an On-screen Keyboard can be created in Silverlight, the layout used is the United Kingdom or "EN-GB" Layout, you can chanfe the _rowOne, _rowTwo, _rowThree and _rowFour String arrays to match your layout, such as swapping Y and Z for German layout etc, make it your own!
![]()