FlipPanel Control is a double-sided panel, which when flipped displays content on the "back", and also displays content on the "front" when not flipped.
Printer Friendly Download Tutorial (476KB) Download Source Code (11.2KB) Online Demonstration
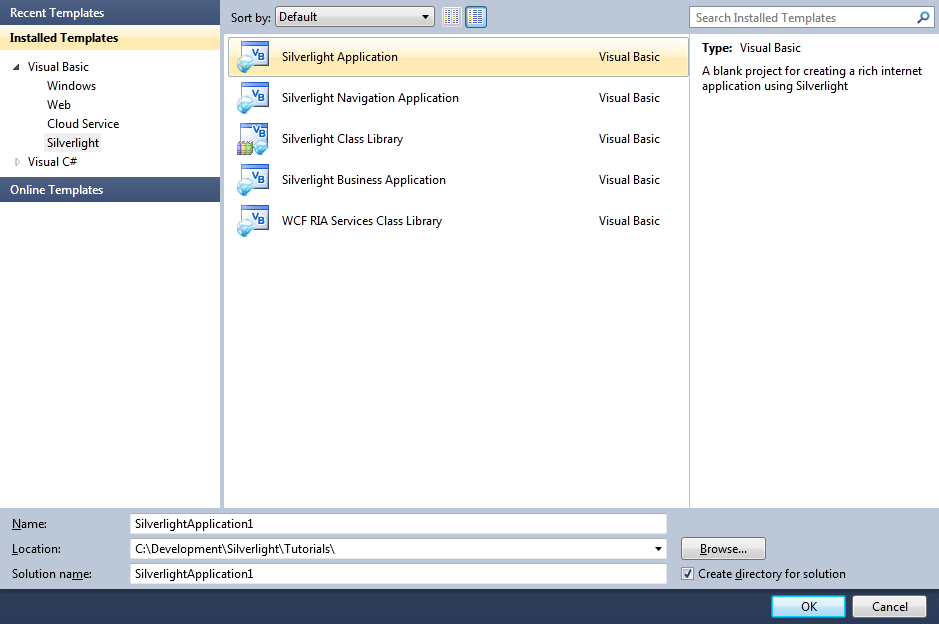
Step 1
Start Microsoft Visual Web Developer 2010 Express, then Select File then New Project... Select "Visual Basic" then "Silverlight Application" from Templates, select a Location if you wish, then enter a name for the Project and then click OK, see below:
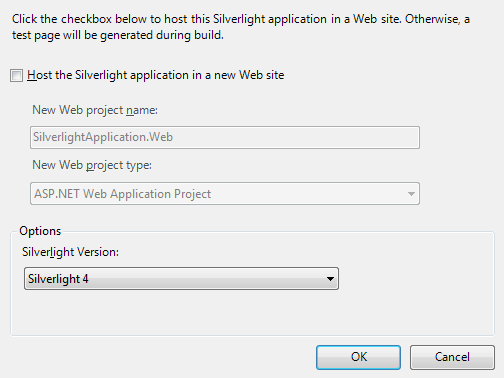
Step 2
New Silverlight Application window should appear, uncheck the box "Host the Silverlight Application in a new Web site" and then select the required Silverlight Version, see below:
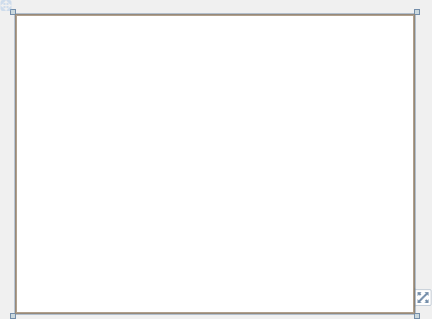
Step 3
A Blank Page named MainPage.xaml should then appear, see below:
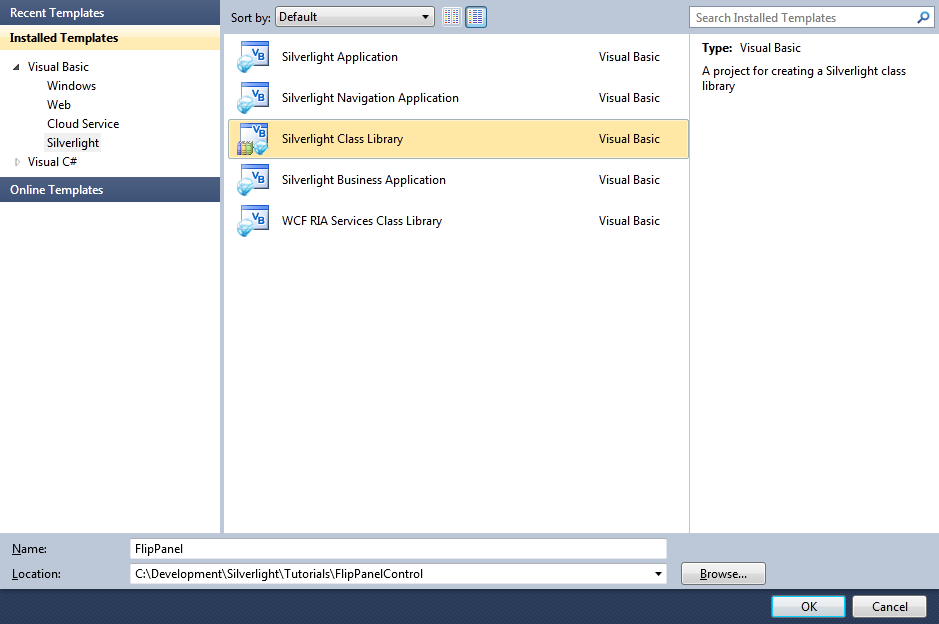
Step 4
Select from the Main Menu: "File" then "Add", then "New Project..." The "New Project" window should appear, select "Silverlight Class Library" with the Name "FlipPanel" without the quotes, see below:
Step 5
In the "Choose the version of Silverlight you want to target from the list of installed Silverlight SDK's"
choose the same version of Silverlight for example Silverlight 4 and click OK.
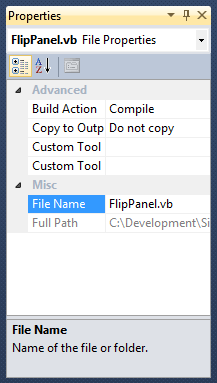
Then in the Solution Explorer for "FlipPanel", click on the "Class1.vb" entry, then goto Properties and change the File Name to "FlipPanel.vb" (without the quotes), see below:
Step 6
In the "You are renaming a file. Would you also like to perform a rename in this project of all references to the code element 'Class1'?" choose Yes.
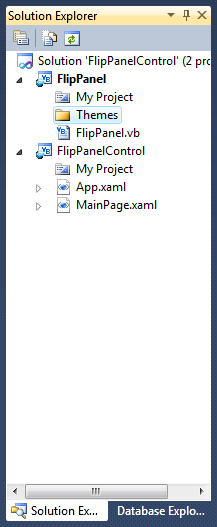
Right Click on the Entry for the "FlipPanel" Project (not the FlipPanel.vb) in Solution Explorer and choose "Add" then "New Folder",
and give it the Name "Themes" (again without quotes), see below:
Step 7
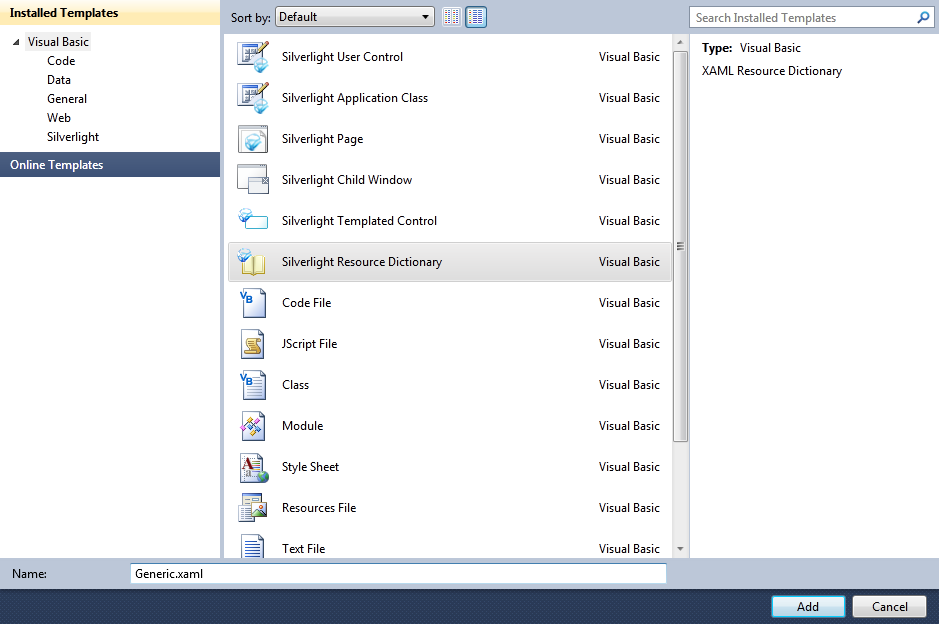
Right Click on the Entry for the "Themes" Folder for the FlipPanel Project, and choose "Add", then "New Item...", select "Silverlight Resource Dictionary" with the Name "Generic.xaml", without quotes, see below:
Step 8
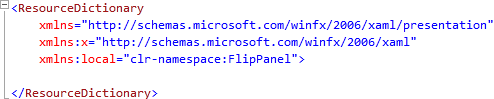
In the XAML Pane for the Generic.xaml, in the "ResourceDictionary" tag type the following XAML namespace:
xmlns:local="clr-namespace:FlipPanel"
See below:
Step 9
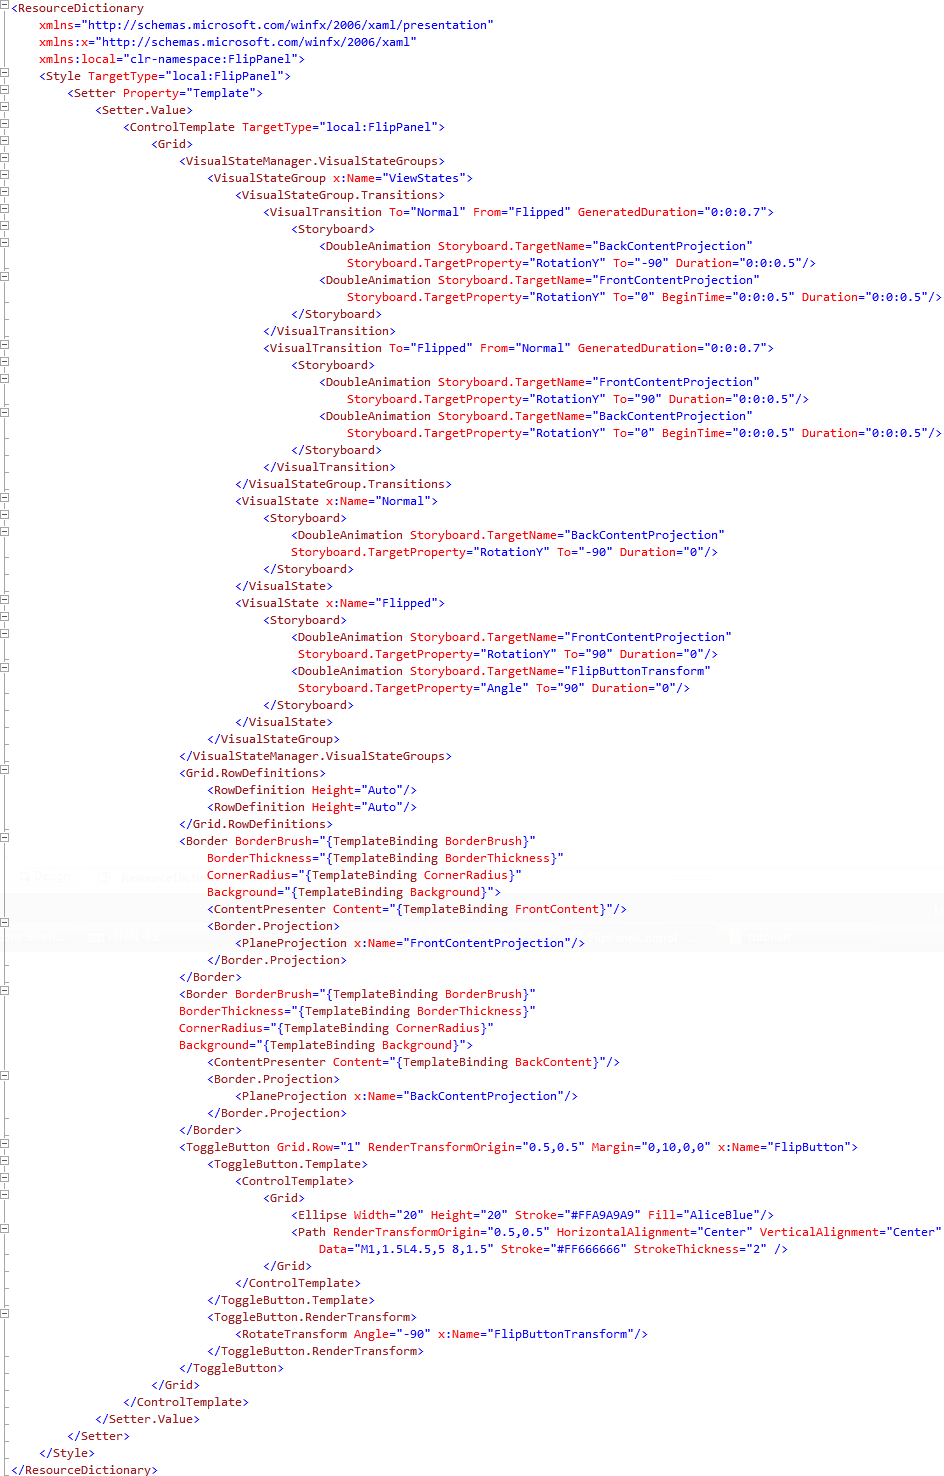
While still the XAML Pane for the Generic.xaml, above the "</ResourceDictionary>" tag and below the top "<ResourceDictionary>" tag, type the following XAML:
<Style TargetType="local:FlipPanel">
  <Setter Property="Template">
    <Setter.Value>
      <ControlTemplate TargetType="local:FlipPanel">
        <Grid>
          <VisualStateManager.VisualStateGroups>
            <VisualStateGroup x:Name="ViewStates">
              <VisualStateGroup.Transitions>
                <VisualTransition To="Normal" From="Flipped" GeneratedDuration="0:0:0.7">
                  <Storyboard>
                    <DoubleAnimation Storyboard.TargetName="BackContentProjection"
                       Storyboard.TargetProperty="RotationY" To="-90" Duration="0:0:0.5"/>
                    <DoubleAnimation Storyboard.TargetName="FrontContentProjection"
                       Storyboard.TargetProperty="RotationY" To="0" BeginTime="0:0:0.5" Duration="0:0:0.5"/>
                  </Storyboard>
                </VisualTransition>
                <VisualTransition To="Flipped" From="Normal" GeneratedDuration="0:0:0.7">
                  <Storyboard>
                    <DoubleAnimation Storyboard.TargetName="FrontContentProjection"
                        Storyboard.TargetProperty="RotationY" To="90" Duration="0:0:0.5"/>
                    <DoubleAnimation Storyboard.TargetName="BackContentProjection"
                        Storyboard.TargetProperty="RotationY" To="0" BeginTime="0:0:0.5" Duration="0:0:0.5"/>
                  </Storyboard>
                </VisualTransition>
              </VisualStateGroup.Transitions>
              <VisualState x:Name="Normal">
                <Storyboard>
                  <DoubleAnimation Storyboard.TargetName="BackContentProjection"
                      Storyboard.TargetProperty="RotationY" To="-90" Duration="0"/>
                </Storyboard>
              </VisualState>
              <VisualState x:Name="Flipped">
                <Storyboard>
                  <DoubleAnimation Storyboard.TargetName="FrontContentProjection"
                      Storyboard.TargetProperty="RotationY" To="90" Duration="0"/>
                  <DoubleAnimation Storyboard.TargetName="FlipButtonTransform"
                      Storyboard.TargetProperty="Angle" To="90" Duration="0"/>
                </Storyboard>
              </VisualState>
            </VisualStateGroup>
          </VisualStateManager.VisualStateGroups>
          <Grid.RowDefinitions>
            <RowDefinition Height="Auto"/>
            <RowDefinition Height="Auto"/>
          </Grid.RowDefinitions>
          <Border BorderBrush="{TemplateBinding BorderBrush}"
              BorderThickness="{TemplateBinding BorderThickness}"
              CornerRadius="{TemplateBinding CornerRadius}"
              Background="{TemplateBinding Background}">
            <ContentPresenter Content="{TemplateBinding FrontContent}"/>
            <Border.Projection>
              <PlaneProjection x:Name="FrontContentProjection"/>
            </Border.Projection>
          </Border>
          <Border BorderBrush="{TemplateBinding BorderBrush}"
              BorderThickness="{TemplateBinding BorderThickness}"
              CornerRadius="{TemplateBinding CornerRadius}"
              Background="{TemplateBinding Background}">
            <ContentPresenter Content="{TemplateBinding BackContent}"/>
            <Border.Projection>
              <PlaneProjection x:Name="BackContentProjection"/>
            </Border.Projection>
          </Border>
          <ToggleButton Grid.Row="1" RenderTransformOrigin="0.5,0.5" Margin="0,10,0,0" x:Name="FlipButton">
            <ToggleButton.Template>
              <ControlTemplate>
                <Grid>
                  <Ellipse Width="20" Height="20" Stroke="#FFA9A9A9" Fill="AliceBlue"/>
                  <Path RenderTransformOrigin="0.5,0.5" HorizontalAlignment="Center" VerticalAlignment="Center"
                      Data="M1,1.5L4.5,5 8,1.5" Stroke="#FF666666" StrokeThickness="2" />
                </Grid>
              </ControlTemplate>
            </ToggleButton.Template>
            <ToggleButton.RenderTransform>
              <RotateTransform Angle="-90" x:Name="FlipButtonTransform"/>
            </ToggleButton.RenderTransform>
          </ToggleButton>
        </Grid>
      </ControlTemplate>
    </Setter.Value>
  </Setter>
</Style>
See below:
Step 10
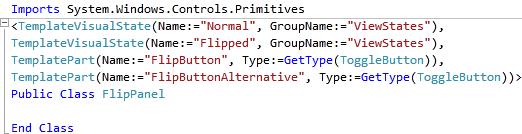
Double Click on the Entry for the "FlipPanel.vb" Class in Solution Explorer in the "FlipPanel" project.
In the Code View for FlipPanel above the "Public Class FlipPanel" line type the following:
Imports System.Windows.Controls.Primitives
<TemplateVisualState(Name:="Normal", GroupName:="ViewStates"),
TemplateVisualState(Name:="Flipped", GroupName:="ViewStates"),
TemplatePart(Name:="FlipButton", Type:=GetType(ToggleButton)),
TemplatePart(Name:="FlipButtonAlternative", Type:=GetType(ToggleButton))>
See Below:
Step 11
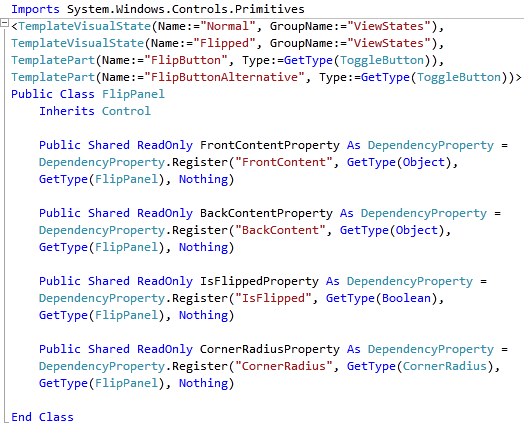
While still in the Code View for FlipPanel.vb, below the "Public Class FlipPanel" line type the following:
Inherits Control

Public Shared ReadOnly FrontContentProperty As DependencyProperty =
DependencyProperty.Register("FrontContent", GetType(Object),
GetType(FlipPanel), Nothing)

Public Shared ReadOnly BackContentProperty As DependencyProperty =
DependencyProperty.Register("BackContent", GetType(Object),
GetType(FlipPanel), Nothing)

Public Shared ReadOnly IsFlippedProperty As DependencyProperty =
DependencyProperty.Register("IsFlipped", GetType(Boolean),
GetType(FlipPanel), Nothing)

Public Shared ReadOnly CornerRadiusProperty As DependencyProperty =
DependencyProperty.Register("CornerRadius", GetType(CornerRadius),
GetType(FlipPanel), Nothing)
See Below:
Step 12
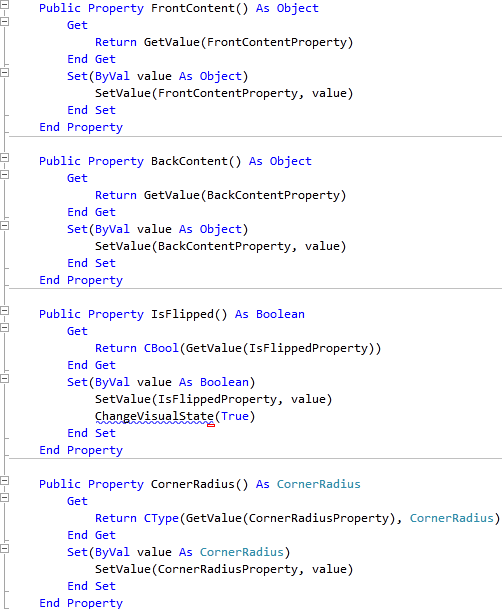
While still in the Code View for FlipPanel.vb, above the "End Class" for "Public Class FlipPanel", type the following Properties:
Public Property FrontContent() As Object
  Get
    Return GetValue(FrontContentProperty)
  End Get
  Set(ByVal value As Object)
    SetValue(FrontContentProperty, value)
  End Set
End Property

Public Property BackContent() As Object
  Get
    Return GetValue(BackContentProperty)
  End Get
  Set(ByVal value As Object)
    SetValue(BackContentProperty, value)
  End Set
End Property

Public Property IsFlipped() As Boolean
  Get
    Return CBool(GetValue(IsFlippedProperty))
  End Get
  Set(ByVal value As Boolean)
    SetValue(IsFlippedProperty, value)
    ChangeVisualState(True)
  End Set
End Property

Public Property CornerRadius() As CornerRadius
  Get
    Return CType(GetValue(CornerRadiusProperty), CornerRadius)
  End Get
  Set(ByVal value As CornerRadius)
    SetValue(CornerRadiusProperty, value)
  End Set
End Property
See Below:
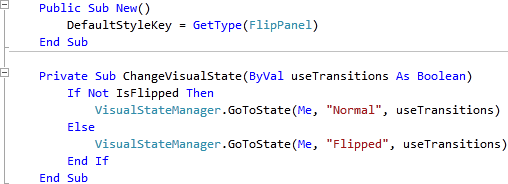
Step 13
While still in the Code View for FlipPanel.vb, above the "End Class" for "Public Class FlipPanel", type the following Constructor and Sub:
Public Sub New()
  DefaultStyleKey = GetType(FlipPanel)
End Sub

Private Sub ChangeVisualState(ByVal useTransitions As Boolean)
  If Not IsFlipped Then
    VisualStateManager.GoToState(Me, "Normal", useTransitions)
  Else
    VisualStateManager.GoToState(Me, "Flipped", useTransitions)
  End If
End Sub
See Below:
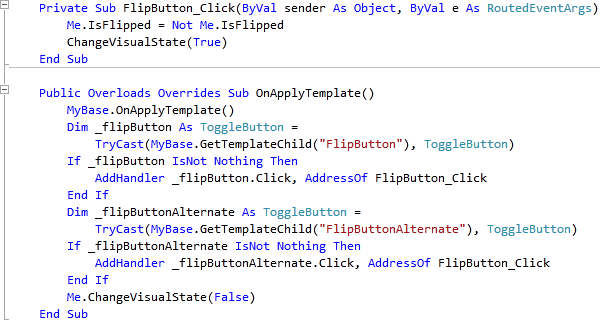
Step 14
While still in the Code View for FlipPanel.vb, above the "End Class" for "Public Class FlipPanel", type the following Event Handlers:
Private Sub FlipButton_Click(ByVal sender As Object, ByVal e As RoutedEventArgs)
  Me.IsFlipped = Not Me.IsFlipped
  ChangeVisualState(True)
End Sub

Public Overrides Sub OnApplyTemplate()
  MyBase.OnApplyTemplate()
  Dim _flipButton As ToggleButton =
    TryCast(MyBase.GetTemplateChild("FlipButton"), ToggleButton)
  If _flipButton IsNot Nothing Then
    AddHandler _flipButton.Click, AddressOf FlipButton_Click
  End If
  Dim _flipButtonAlternate As ToggleButton =
    TryCast(MyBase.GetTemplateChild("FlipButtonAlternate"), ToggleButton)
  If _flipButtonAlternate IsNot Nothing Then
    AddHandler _flipButtonAlternate.Click, AddressOf FlipButton_Click
  End If
  Me.ChangeVisualState(False)
End Sub
See Below:
Step 15
Select Debug then the "Build FlipPanel" option from the menu, see below:
Step 16
Return to the MainPage.xaml Designer View by selecting the "MainPage.xaml" Tab, or Double Clicking on the Entry for "MainPage.xaml"
in Solution Explorer for the Main Project.
Then from the All Silverlight Controls section in the Toolbox select the Canvas control:
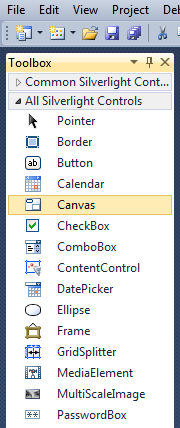
Step 17
Draw a Canvas that fill the whole Page or in the XAML Pane between the "<Grid>" and "</Grid>" lines type the following XAML:
<Canvas Height="300" Width="400" HorizontalAlignment="Left" VerticalAlignment="Top" Name="Page">
</Canvas>
See below:
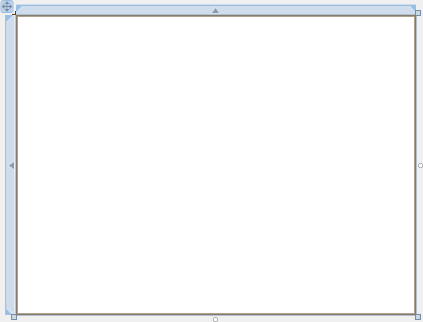
Step 18
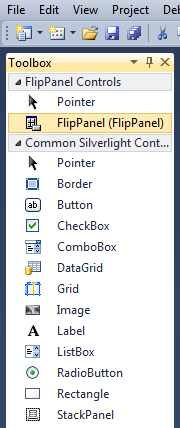
Then from the FlipPanel Controls section in the Toolbox select the FlipPanel control:
Step 19
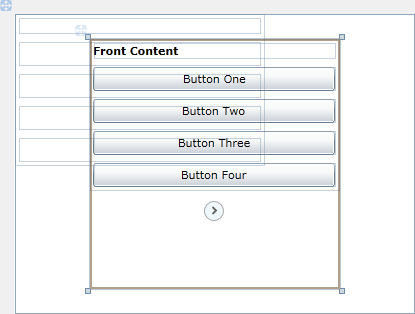
Draw an FlipPanel on the Page (Canvas) by dragging the Button from the Toolbox onto the Canvas, then in the XAML Pane inbetween the "<Canvas>" and "</Canvas>" tags change the "my:FlipPanel" XAML to the following:
<my:FlipPanel Canvas.Left="75" Canvas.Top="25" Height="250" Width="250">
  <my:FlipPanel.FrontContent>
    <StackPanel>
      <TextBlock Margin="4" FontWeight="Bold" Text="Front Content"/>
      <Button Margin="4" Padding="4" Content="Button One"/>
      <Button Margin="4" Padding="4" Content="Button Two"/>
      <Button Margin="4" Padding="4" Content="Button Three"/>
      <Button Margin="4" Padding="4" Content="Button Four"/>
    </StackPanel>
  </my:FlipPanel.FrontContent>
  <my:FlipPanel.BackContent>
    <StackPanel>
      <TextBlock Margin="4" FontWeight="Bold" Text="Back Content"/>
      <CheckBox Margin="4" Padding="4" Content="CheckBox One"/>
      <CheckBox Margin="4" Padding="4" Content="CheckBox Two"/>
      <CheckBox Margin="4" Padding="4" Content="CheckBox Three"/>
      <CheckBox Margin="4" Padding="4" Content="CheckBoxn Four"/>
    </StackPanel>
  </my:FlipPanel.BackContent>
</my:FlipPanel>
See below:
Step 20
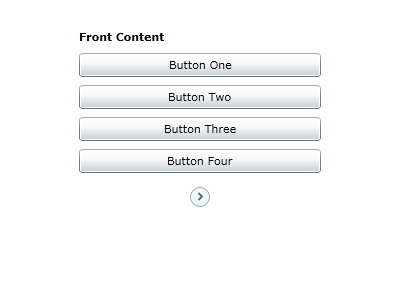
Save the Project as you have now finished the Silverlight application. Select Debug then Start Debugging or click on Start Debugging:
After you do, the following will appear in a new Web Browser window:
Step 21
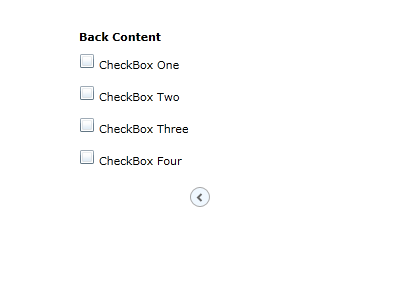
Click on the Round button with the Arrow to Flip the FlipPanel, see below:
Step 22
Close the Application and Browser window by clicking on the Close Button ![]() on
the top right of the Application Window and Web Browser to Stop the application.
on
the top right of the Application Window and Web Browser to Stop the application.
This is a simple example of how to create an FlipPanel control! It could be expanded to add more Properties and functionality such as flipping horizontally and vertically for example - make it your own!
![]()