
This Tutorial adds Find & Replace to the Text Editor (Part One), please follow all the Steps of Text Editor (Part One) before starting this Tutorial, or use the Source Code from Part One and start from there.
www.cespage.com/vb/vb08tut4.html
Step 1
Start Microsoft Visual Basic 2008 Express Edition, then select File then Open Project... and select the Solution File for Part One (e.g. TextEditorPartOne.sln), the following should then appear:
Step 2
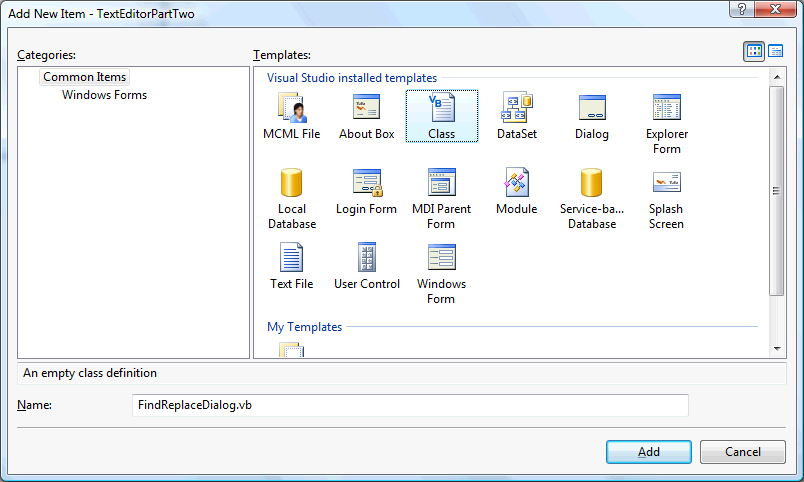
Then select Project then Add Class... and choose the "Class" Template if it is not already
selected and give it the Name "FindReplaceDialog.vb" without the quotes, see below:
Step 3
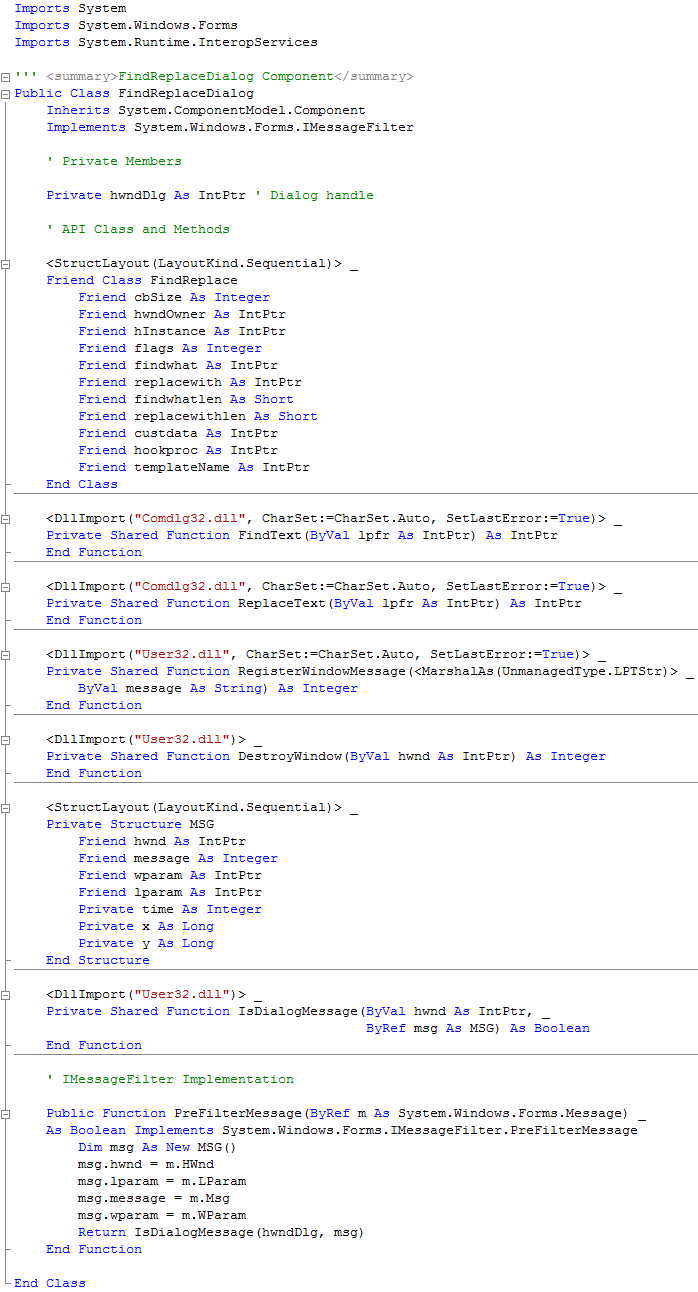
With the empty FindReplaceDialog Class displayed, if not double click on the "FindReplaceDialog.vb" item in Solution Explorer, then enter the following above the Public Class FindReplaceDialog line:
Imports System
Imports System.Windows.Forms
Imports System.Runtime.InteropServices

''' <summary>FindReplaceDialog Component</summary>
Enter the following below the Public Class FindReplaceDialog:
' Private Members

Private hwndDlg As IntPtr ' Dialog handle

' API Class and Methods

<StructLayout(LayoutKind.Sequential)> _
Friend Class FindReplace
  Friend cbSize As Integer
  Friend hwndOwner As IntPtr
  Friend hInstance As IntPtr
  Friend flags As Integer
  Friend findwhat As IntPtr
  Friend replacewith As IntPtr
  Friend findwhatlen As Short
  Friend replacewithlen As Short
  Friend custdata As IntPtr
  Friend hookproc As IntPtr
  Friend templateName As IntPtr
End Class

<DllImport("Comdlg32.dll", CharSet:=CharSet.Auto, SetLastError:=True)> _
Private Shared Function FindText(ByVal lpfr As IntPtr) As IntPtr
End Function

<DllImport("Comdlg32.dll", CharSet:=CharSet.Auto, SetLastError:=True)> _
Private Shared Function ReplaceText(ByVal lpfr As IntPtr) As IntPtr
End Function

<DllImport("User32.dll", CharSet:=CharSet.Auto, SetLastError:=True)> _
Private Shared Function RegisterWindowMessage(<MarshalAs(UnmanagedType.LPTStr)> _
  ByVal message As String) As Integer
End Function

<DllImport("User32.dll")> _
Private Shared Function DestroyWindow(ByVal hwnd As IntPtr) As Integer
End Function

<StructLayout(LayoutKind.Sequential)> _
Private Structure MSG
  Friend hwnd As IntPtr
  Friend message As Integer
  Friend wparam As IntPtr
  Friend lparam As IntPtr
  Private time As Integer
  Private x As Long
  Private y As Long
End Structure

<DllImport("User32.dll")> _
Private Shared Function IsDialogMessage(ByVal hwnd As IntPtr, _
                                        ByRef msg As MSG) As Boolean
End Function

' IMessageFilter Implementation

Public Function PreFilterMessage(ByRef m As System.Windows.Forms.Message) _
As Boolean Implements System.Windows.Forms.IMessageFilter.PreFilterMessage
  Dim msg As New MSG()
  msg.hwnd = m.HWnd
  msg.lparam = m.LParam
  msg.message = m.Msg
  msg.wparam = m.WParam
  Return IsDialogMessage(hwndDlg, msg)
End Function
See Below:
Step 4
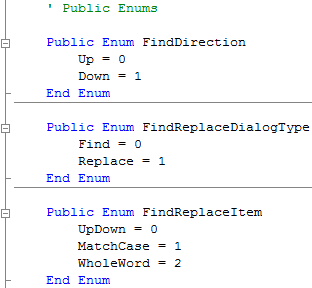
Still with the FindReplaceDialog Class Displayed, go to the Top of the Class and below the "Implements System.Windows.Forms.IMessageFilter" and above the "Private Members" section type the following Public Enums:
' Public Enums

Public Enum FindDirection
  Up = 0
  Down = 1
End Enum

Public Enum FindReplaceDialogType
  Find = 0
  Replace = 1
End Enum

Public Enum FindReplaceItem
  UpDown = 0
  MatchCase = 1
  WholeWord = 2
End Enum
See Below:
Step 5
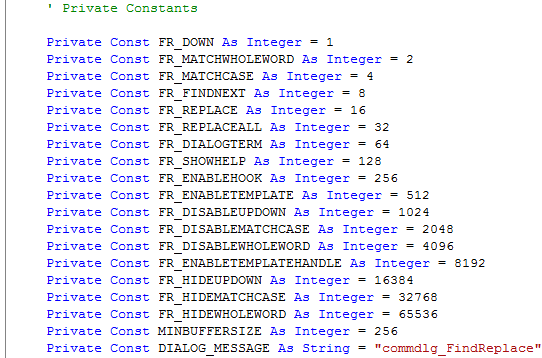
After the Public Enums entered below this type the following Private Constants:
' Private Constants

Private Const FR_DOWN As Integer = 1
Private Const FR_MATCHWHOLEWORD As Integer = 2
Private Const FR_MATCHCASE As Integer = 4
Private Const FR_FINDNEXT As Integer = 8
Private Const FR_REPLACE As Integer = 16
Private Const FR_REPLACEALL As Integer = 32
Private Const FR_DIALOGTERM As Integer = 64
Private Const FR_SHOWHELP As Integer = 128
Private Const FR_ENABLEHOOK As Integer = 256
Private Const FR_ENABLETEMPLATE As Integer = 512
Private Const FR_DISABLEUPDOWN As Integer = 1024
Private Const FR_DISABLEMATCHCASE As Integer = 2048
Private Const FR_DISABLEWHOLEWORD As Integer = 4096
Private Const FR_ENABLETEMPLATEHANDLE As Integer = 8192
Private Const FR_HIDEUPDOWN As Integer = 16384
Private Const FR_HIDEMATCHCASE As Integer = 32768
Private Const FR_HIDEWHOLEWORD As Integer = 65536
Private Const MINBUFFERSIZE As Integer = 256
Private Const DIALOG_MESSAGE As String = "commdlg_FindReplace"
See Below:
Step 6
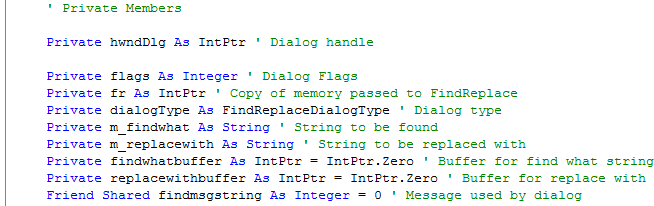
In FindReplaceDialog Class enter the following above the "API Class and Methods" section and at the end of the "Private Members" section enter the following:
Private flags As Integer ' Dialog Flags
Private fr As IntPtr ' Copy of memory passed to FindReplace
Private dialogType As FindReplaceDialogType ' Dialog type
Private m_findwhat As String ' String to be found
Private m_replacewith As String ' String to be replaced with
Private findwhatbuffer As IntPtr = IntPtr.Zero ' Buffer for find what string
Private replacewithbuffer As IntPtr = IntPtr.Zero ' Buffer for replace with
Friend Shared findmsgstring As Integer = 0 ' Message used by dialog
See Below:
Step 7
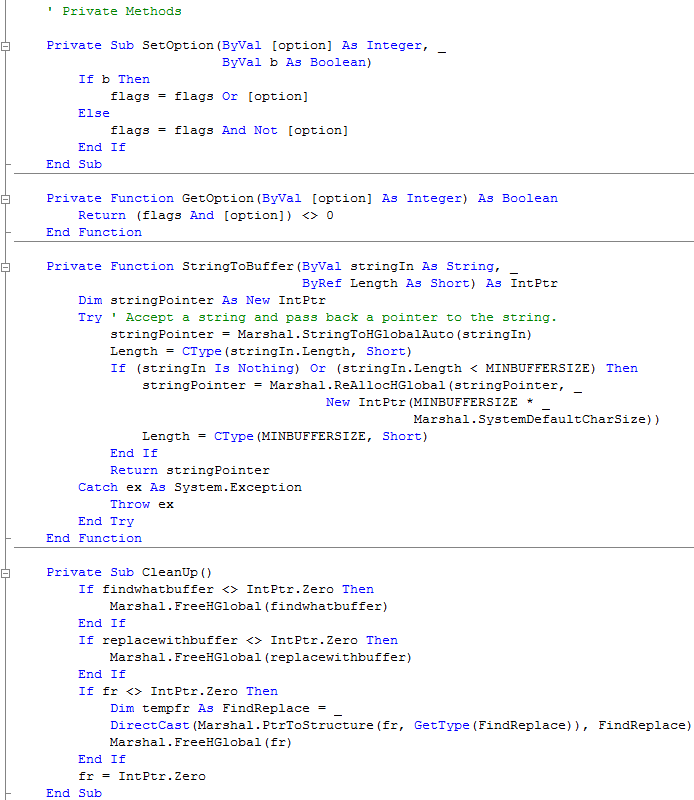
Still in the FindReplaceDialog Class, enter the following Private Methods below the "Private Members" section and above the "API Class and Methods" section:
' Private Methods

Private Sub SetOption(ByVal [option] As Integer, _
                      ByVal b As Boolean)
  If b Then
    flags = flags Or [option]
  Else
    flags = flags And Not [option]
  End If
End Sub

Private Function GetOption(ByVal [option] As Integer) As Boolean
  Return (flags And [option]) <> 0
End Function

Private Function StringToBuffer(ByVal stringIn As String, _
                                ByRef Length As Short) As IntPtr
  Dim stringPointer As New IntPtr
  Try ' Accept a string and pass back a pointer to the string.
    stringPointer = Marshal.StringToHGlobalAuto(stringIn)
    Length = CType(stringIn.Length, Short)
    If (stringIn Is Nothing) Or (stringIn.Length < MINBUFFERSIZE) Then
      stringPointer = Marshal.ReAllocHGlobal(stringPointer, _
                           New IntPtr(MINBUFFERSIZE * _
                                      Marshal.SystemDefaultCharSize))
      Length = CType(MINBUFFERSIZE, Short)
    End If
    Return stringPointer
  Catch ex As System.Exception
    Throw ex
  End Try
End Function

Private Sub CleanUp()
  If findwhatbuffer <> IntPtr.Zero Then
    Marshal.FreeHGlobal(findwhatbuffer)
  End If
  If replacewithbuffer <> IntPtr.Zero Then
    Marshal.FreeHGlobal(replacewithbuffer)
  End If
  If fr <> IntPtr.Zero Then
    Dim tempfr As FindReplace = _
    DirectCast(Marshal.PtrToStructure(fr, GetType(FindReplace)), FindReplace)
    Marshal.FreeHGlobal(fr)
  End If
  fr = IntPtr.Zero
End Sub
See Below:
Step 8
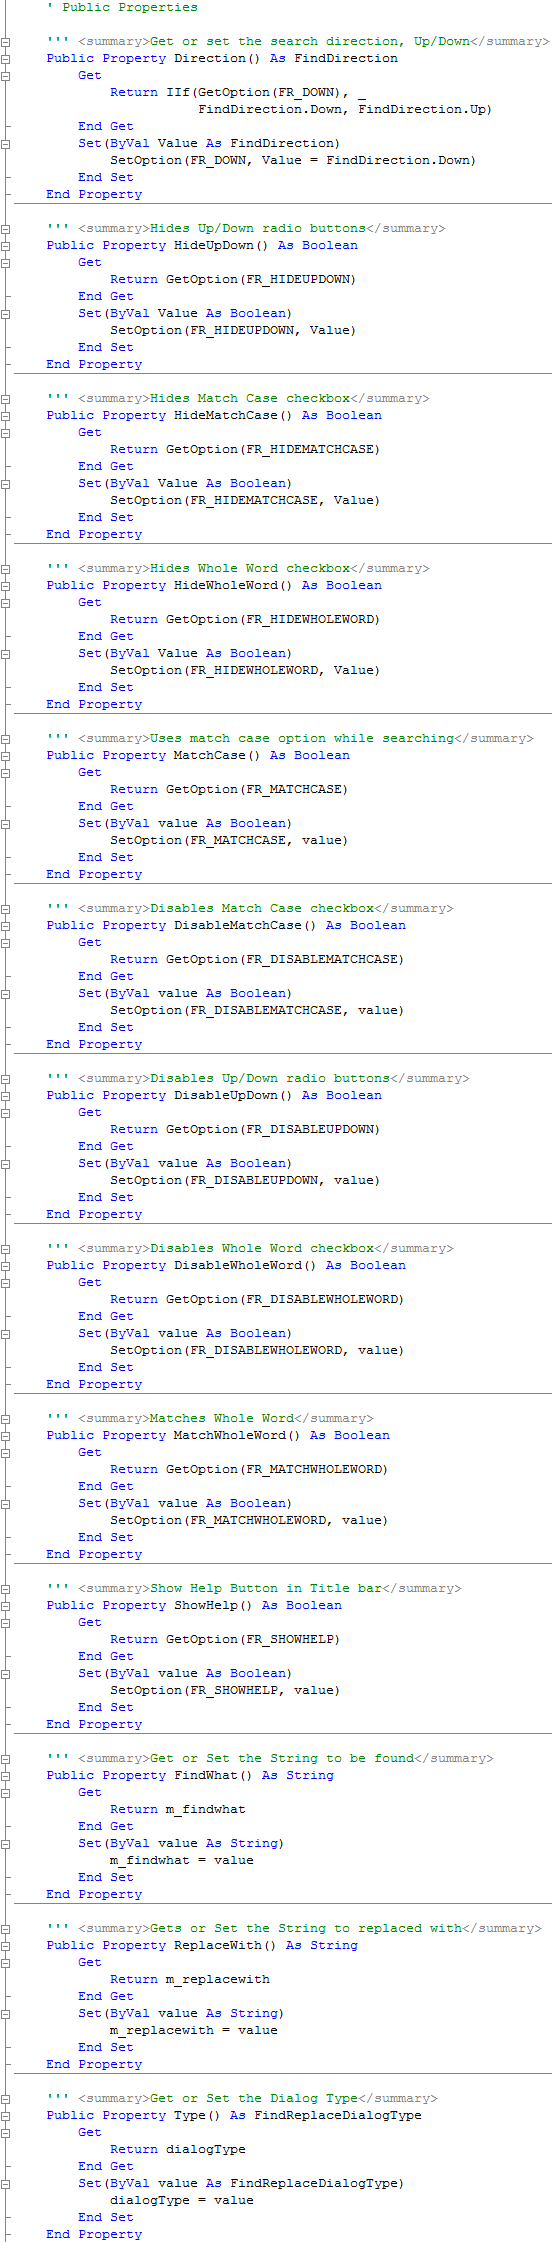
Goto the Bottom of the FindReplaceDialogClass and type the following Public Properties above the "End Class" section:
' Public Properties

''' <summary>Get or set the search direction, Up/Down</summary>
Public Property Direction() As FindDirection
  Get
    Return IIf(GetOption(FR_DOWN), _
                       FindDirection.Down, FindDirection.Up)
  End Get
  Set(ByVal Value As FindDirection)
    SetOption(FR_DOWN, Value = FindDirection.Down)
  End Set
End Property

''' <summary>Hides Up/Down radio buttons</summary>
Public Property HideUpDown() As Boolean
  Get
    Return GetOption(FR_HIDEUPDOWN)
  End Get
  Set(ByVal Value As Boolean)
    SetOption(FR_HIDEUPDOWN, Value)
  End Set
End Property

''' <summary>Hides Match Case checkbox</summary>
Public Property HideMatchCase() As Boolean
  Get
    Return GetOption(FR_HIDEMATCHCASE)
  End Get
  Set(ByVal Value As Boolean)
    SetOption(FR_HIDEMATCHCASE, Value)
  End Set
End Property

''' <summary>Hides Whole Word checkbox</summary>
Public Property HideWholeWord() As Boolean
  Get
    Return GetOption(FR_HIDEWHOLEWORD)
  End Get
  Set(ByVal Value As Boolean)
    SetOption(FR_HIDEWHOLEWORD, Value)
  End Set
End Property

''' <summary>Uses match case option while searching</summary>
Public Property MatchCase() As Boolean
  Get
    Return GetOption(FR_MATCHCASE)
  End Get
  Set(ByVal value As Boolean)
    SetOption(FR_MATCHCASE, value)
  End Set
End Property

''' <summary>Disables Match Case checkbox</summary>
Public Property DisableMatchCase() As Boolean
  Get
    Return GetOption(FR_DISABLEMATCHCASE)
  End Get
  Set(ByVal value As Boolean)
    SetOption(FR_DISABLEMATCHCASE, value)
  End Set
End Property

''' <summary>Disables Up/Down radio buttons</summary>
Public Property DisableUpDown() As Boolean
  Get
    Return GetOption(FR_DISABLEUPDOWN)
  End Get
  Set(ByVal value As Boolean)
    SetOption(FR_DISABLEUPDOWN, value)
  End Set
End Property

''' <summary>Disables Whole Word checkbox</summary>
Public Property DisableWholeWord() As Boolean
  Get
    Return GetOption(FR_DISABLEWHOLEWORD)
  End Get
  Set(ByVal value As Boolean)
    SetOption(FR_DISABLEWHOLEWORD, value)
  End Set
End Property

''' <summary>Matches Whole Word</summary>
Public Property MatchWholeWord() As Boolean
  Get
    Return GetOption(FR_MATCHWHOLEWORD)
  End Get
  Set(ByVal value As Boolean)
    SetOption(FR_MATCHWHOLEWORD, value)
  End Set
End Property

''' <summary>Show Help Button in Title bar</summary>
Public Property ShowHelp() As Boolean
  Get
    Return GetOption(FR_SHOWHELP)
  End Get
  Set(ByVal value As Boolean)
    SetOption(FR_SHOWHELP, value)
  End Set
End Property

''' <summary>Get or Set the String to be found</summary>
Public Property FindWhat() As String
  Get
    Return m_findwhat
  End Get
  Set(ByVal value As String)
    m_findwhat = value
  End Set
End Property

''' <summary>Gets or Set the String to replaced with</summary>
Public Property ReplaceWith() As String
  Get
    Return m_replacewith
  End Get
  Set(ByVal value As String)
    m_replacewith = value
  End Set
End Property

''' <summary>Get or Set the Dialog Type</summary>
Public Property Type() As FindReplaceDialogType
  Get
    Return dialogType
  End Get
  Set(ByVal value As FindReplaceDialogType)
    dialogType = value
  End Set
End Property
See Below:
Step 9
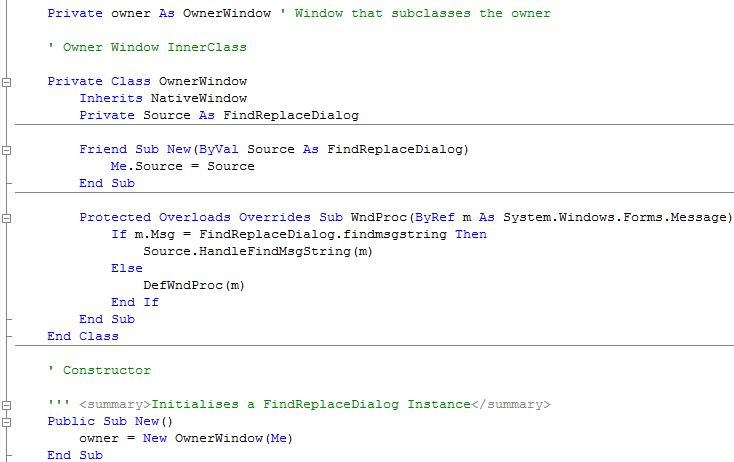
Find the "Private Members" section of FindReplaceDialog and after the last item or above "Private Methods", enter the follow Declaration and Inner Class:
Private owner As OwnerWindow ' Window that subclasses the owner

' Owner Window InnerClass

Private Class OwnerWindow
  Inherits NativeWindow
  Private Source As FindReplaceDialog

  Friend Sub New(ByVal Source As FindReplaceDialog)
    Me.Source = Source
  End Sub

  Protected Overloads Overrides Sub WndProc(ByRef m As System.Windows.Forms.Message)
    If m.Msg = FindReplaceDialog.findmsgstring Then
      Source.HandleFindMsgString(m)
    Else
      DefWndProc(m)
    End If
  End Sub
End Class

' Constructor

''' <summary>Initialises a FindReplaceDialog Instance</summary>
Public Sub New()
    owner = New OwnerWindow(Me)
End Sub
See Below:
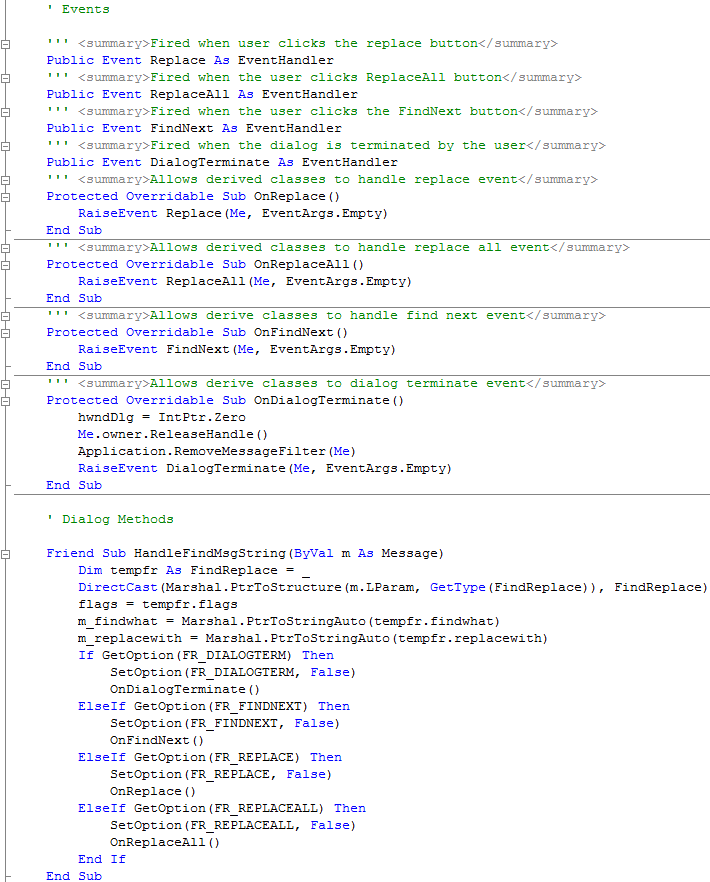
Then enter the following above the "End Class" of FindReplaceDialog or below the "Public Properties":
' Events

''' <summary>Fired when user clicks the replace button</summary>
Public Event Replace As EventHandler
''' <summary>Fired when the user clicks ReplaceAll button</summary>
Public Event ReplaceAll As EventHandler
''' <summary>Fired when the user clicks the FindNext button</summary>
Public Event FindNext As EventHandler
''' <summary>Fired when the dialog is terminated by the user</summary>
Public Event DialogTerminate As EventHandler
''' <summary>Allows derived classes to handle replace event</summary>
Protected Overridable Sub OnReplace()
  RaiseEvent Replace(Me, EventArgs.Empty)
End Sub
''' <summary>Allows derived classes to handle replace all event</summary>
Protected Overridable Sub OnReplaceAll()
  RaiseEvent ReplaceAll(Me, EventArgs.Empty)
End Sub
''' <summary>Allows derive classes to handle find next event</summary>
Protected Overridable Sub OnFindNext()
  RaiseEvent FindNext(Me, EventArgs.Empty)
End Sub
''' <summary>Allows derive classes to dialog terminate event</summary>
Protected Overridable Sub OnDialogTerminate()
  hwndDlg = IntPtr.Zero
  Me.owner.ReleaseHandle()
  Application.RemoveMessageFilter(Me)
  RaiseEvent DialogTerminate(Me, EventArgs.Empty)
End Sub

' Dialog Methods

Friend Sub HandleFindMsgString(ByVal m As Message)
  Dim tempfr As FindReplace = _
        DirectCast(Marshal.PtrToStructure(m.LParam, GetType(FindReplace)), FindReplace)
  flags = tempfr.flags
  m_findwhat = Marshal.PtrToStringAuto(tempfr.findwhat)
  m_replacewith = Marshal.PtrToStringAuto(tempfr.replacewith)
  If GetOption(FR_DIALOGTERM) Then
    SetOption(FR_DIALOGTERM, False)
    OnDialogTerminate()
  ElseIf GetOption(FR_FINDNEXT) Then
    SetOption(FR_FINDNEXT, False)
    OnFindNext()
  ElseIf GetOption(FR_REPLACE) Then
    SetOption(FR_REPLACE, False)
    OnReplace()
  ElseIf GetOption(FR_REPLACEALL) Then
    SetOption(FR_REPLACEALL, False)
    OnReplaceAll()
  End If
End Sub
See Below:
Step 10
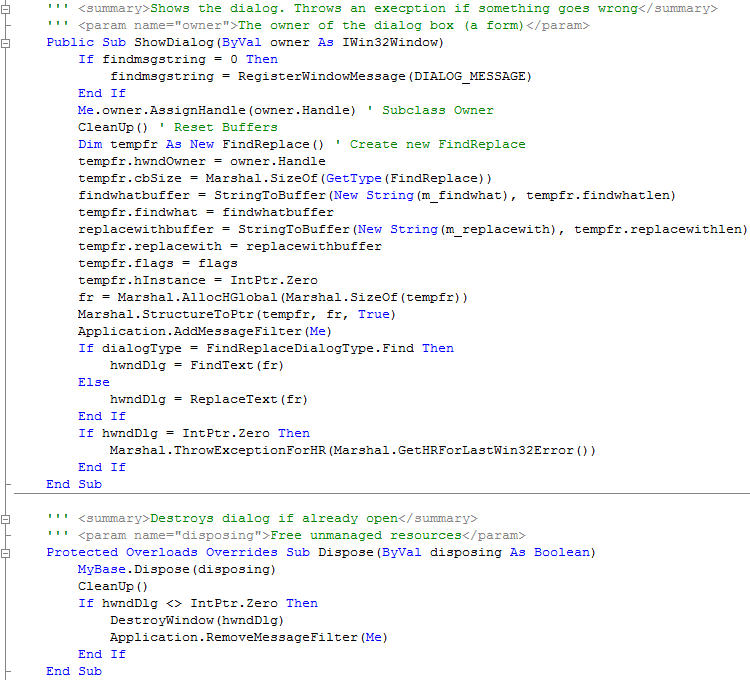
Goto the Bottom of the FindReplaceDialogClass and type the following above the "End Class" or the end the "Dialog Methods" section:
''' <summary>Shows the dialog. Throws an execption if something goes wrong</summary>
''' <param name="owner">The owner of the dialog box (a form)</param>
Public Sub ShowDialog(ByVal owner As IWin32Window)
  If findmsgstring = 0 Then
    findmsgstring = RegisterWindowMessage(DIALOG_MESSAGE)
  End If
  Me.owner.AssignHandle(owner.Handle) ' Subclass Owner
  CleanUp() ' Reset Buffers
  Dim tempfr As New FindReplace() ' Create new FindReplace
  tempfr.hwndOwner = owner.Handle
  tempfr.cbSize = Marshal.SizeOf(GetType(FindReplace))
  findwhatbuffer = StringToBuffer(New String(m_findwhat), tempfr.findwhatlen)
  tempfr.findwhat = findwhatbuffer
  replacewithbuffer = StringToBuffer(New String(m_replacewith), tempfr.replacewithlen)
  tempfr.replacewith = replacewithbuffer
  tempfr.flags = flags
  tempfr.hInstance = IntPtr.Zero
  fr = Marshal.AllocHGlobal(Marshal.SizeOf(tempfr))
  Marshal.StructureToPtr(tempfr, fr, True)
  Application.AddMessageFilter(Me)
  If dialogType = FindReplaceDialogType.Find Then
    hwndDlg = FindText(fr)
  Else
    hwndDlg = ReplaceText(fr)
  End If
  If hwndDlg = IntPtr.Zero Then
    Marshal.ThrowExceptionForHR(Marshal.GetHRForLastWin32Error())
  End If
End Sub

''' <summary>Destroys dialog if already open</summary>
''' <param name="disposing">Free unmanaged resources</param>
Protected Overloads Overrides Sub Dispose(ByVal disposing As Boolean)
  MyBase.Dispose(disposing)
  CleanUp()
  If hwndDlg <> IntPtr.Zero Then
    DestroyWindow(hwndDlg)
    Application.RemoveMessageFilter(Me)
  End If
End Sub
See Below:
Step 11
The FindReplaceDialog Class is now Complete. Right click on the Main Form (frmMain) either on the Form itself by double clicking on the Form in the
Solution Explorer and right clicking on the Form or right click on the entry in the Solution Explorer and choose the View Code option.
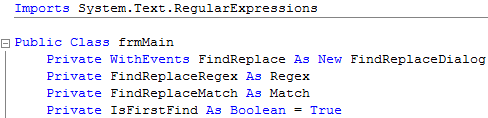
Enter the following above Public Class frmMain:
Imports System.Text.RegularExpressions
Enter the following below the Public Class frmMain:
    Private WithEvents FindReplace As New FindReplaceDialog
    Private FindReplaceRegex As Regex
    Private FindReplaceMatch As Match
    Private IsFirstFind As Boolean = True
See Below:
Step 12
While still in the View Code of frmMain, type the following Function below the Declarations:
    Private Function SearchRegEx() As Regex
        If FindReplace.MatchCase Then ' Search with Match Case
            Return New Regex(Regex.Escape(FindReplace.FindWhat))
        Else ' Search with Ignore Case
            Return New Regex(Regex.Escape(FindReplace.FindWhat), RegexOptions.IgnoreCase)
        End If
    End Function
See Below:

Step 13
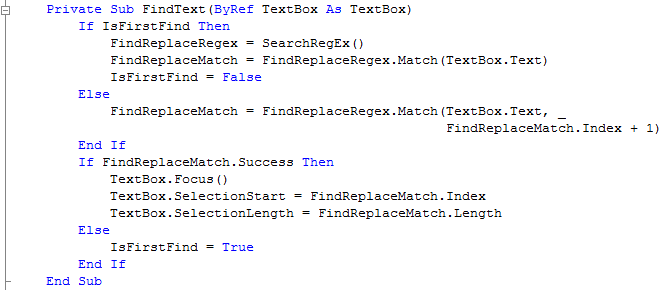
Again while still in the Code View enter the following Sub below the SearchRegEx() Function (just after the "End Function"):
    Private Sub FindText(ByRef TextBox As TextBox)
        If IsFirstFind Then
            FindReplaceRegex = SearchRegEx()
            FindReplaceMatch = FindReplaceRegex.Match(TextBox.Text)
            IsFirstFind = False
        Else
            FindReplaceMatch = FindReplaceRegex.Match(TextBox.Text, _
                                                      FindReplaceMatch.Index + 1)
        End If
        If FindReplaceMatch.Success Then
            TextBox.Focus()
            TextBox.SelectionStart = FindReplaceMatch.Index
            TextBox.SelectionLength = FindReplaceMatch.Length
        Else
            IsFirstFind = True
        End If
    End Sub
See Below:
Step 14
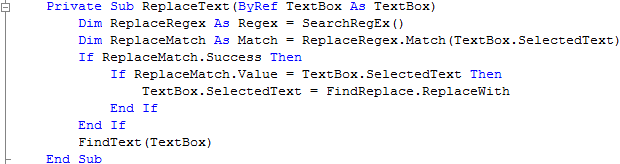
Again while still in the Code View enter the following Sub below the FindText() Sub (just after the "End Sub"):
    Private Sub ReplaceText(ByRef TextBox As TextBox)
        Dim ReplaceRegex As Regex = SearchRegEx()
        Dim ReplaceMatch As Match = ReplaceRegex.Match(TextBox.SelectedText)
        If ReplaceMatch.Success Then
            If ReplaceMatch.Value = TextBox.SelectedText Then
                TextBox.SelectedText = FindReplace.ReplaceWith
            End If
        End If
        FindText(TextBox)
    End Sub
See Below:
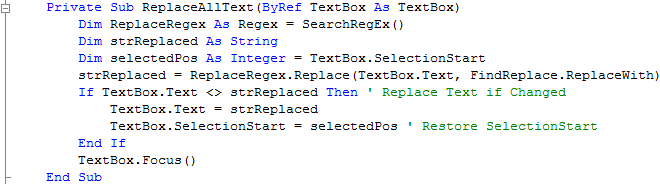
Step 15
Again while still in the Code View enter the following Sub below the ReplaceText() Sub (just after the "End Sub"):
    Private Sub ReplaceAllText(ByRef TextBox As TextBox)
        Dim ReplaceRegex As Regex = SearchRegEx()
        Dim strReplaced As String
        Dim selectedPos As Integer = TextBox.SelectionStart
        strReplaced = ReplaceRegex.Replace(TextBox.Text, FindReplace.ReplaceWith)
        If TextBox.Text <> strReplaced Then ' Replace Text if Changed
            TextBox.Text = strReplaced
            TextBox.SelectionStart = selectedPos ' Restore SelectionStart
        End If
        TextBox.Focus()
    End Sub
See Below:
Step 16
While still in the Code View enter the following Sub below the ReplaceAllText() Sub (just after the "End Sub"):
    Public Sub FindNext(ByRef TextBox As TextBox)
        FindText(TextBox)
    End Sub
See Below:

Step 17
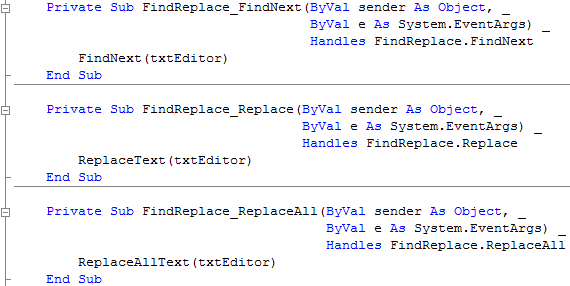
Within the Code View of frmMain, if not right click on the frmMain entry in Solution Explorer and choose View Code, then there should be two drop down lists "(General)" and "(Declarations)", from the first list select "FindReplace", then from the other list select "FindNext", then type the following in the FindReplace_FindNext() Sub:
FindNext(txtEditor)
Still in the Code View select "FindReplace" again from the first then select "Replace" from the second list, then type the following in the FindReplace_Replace() Sub:
ReplaceText(txtEditor)
Again while in the Code View select the "FindReplace" from the first list, then select "ReplaceAll" from the second list, then type the following in the FindReplace_ReplaceAll() Sub:
ReplaceAllText(txtEditor)
See Below:
Step 18
Double-click on the frmMain entry in the Solution Explorer or click on the frmMain [Design] Tab to show the main form.
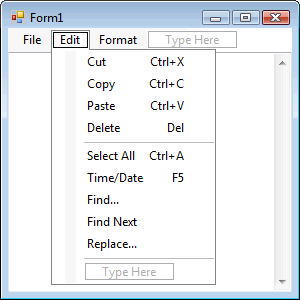
Click on or select the MenuStrip, this is the component with "File" on the top left of the Form, then click on the "Edit" menu, see below:
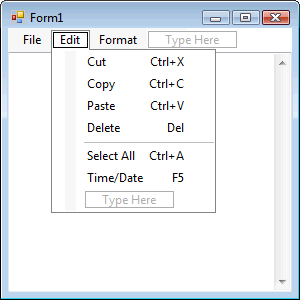
Step 19
At the bottom of the Edit menu will be a "Type Here" box, type "Find...", then in the box below that "Find Next", then "Replace..." and finally "-" this is just a minus or hyphen for the Separator, the menu should appear as below:
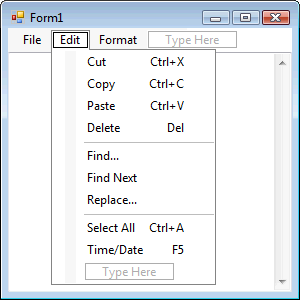
Step 20
Move the "Select All" item to the bottom of the "Edit" menu by clicking on it while keeping it clicked move it to the bottom of the list (towards the "Type Here" box at the bottom), do the same with the "Time/Date" item, they should still be in the same order, the menu should then appear as below:
Step 21
With the Edit Menu displayed or Click on "Edit" on the MenuStrip to show the MenuStrip, Double Click on the Menu Item Labeled "Find..." (FindToolStripMenuItem) and type the following in the FindToolStripMenuItem_Click() Sub:
FindReplace.FindWhat = txtEditor.SelectedText
FindReplace.HideWholeWord = True
FindReplace.Type = FindReplaceDialog.FindReplaceDialogType.Find
FindReplace.ShowDialog(Me)
Click on [Design] tab or double click on the frmMain entry in Solution Explorer again, then Double Click on the Menu Item Labeled "Find Next" (FindNextToolStripMenuItem) and type the following in the FindNextToolStripMenuItem_Click() Sub:
FindNext(txtEditor)
txtEditor.Focus()
Click on [Design] tab or double click on the frmMain entry in Solution Explorer again, then Double Click on the Menu Item Labeled "Replace..." (ReplaceToolStripMenuItem) and type the following in the ReplaceToolStripMenuItem_Click() Sub:
FindReplace.FindWhat = txtEditor.SelectedText
FindReplace.HideWholeWord = True
FindReplace.Type = FindReplaceDialog.FindReplaceDialogType.Replace
FindReplace.ShowDialog(Me)
See Below:

Step 22
Steps 22 & 23 are optional and just add Keyboard Shortcuts to the MenuItems and clean-up the Edit menu you don't have to do these if you don't want to!
Return the the [Design] Tab for frmMain, or Double-click on the frmMain Entry on the Solution Explorer then click on "Edit" on the Form.
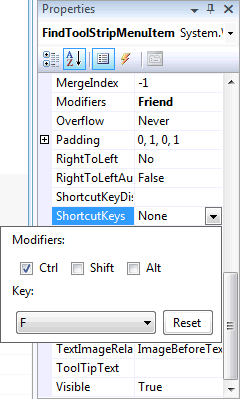
Click on "Find..." then in the Properties box look for the "ShortcutKey" property and click on the Drop Down arrow where "None" appears.
Check the "Ctrl" Checkbox in "Modifiers" and then in the "Key" dropdown list select "F", see below:
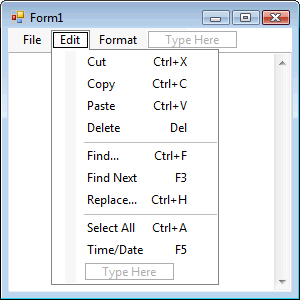
Step 23
Set other added "Edit" MenuItem "ShortcutKey" Properties , "Find Next" should be set to the Key "F3" only and "Replace" should be "Ctrl+H", all without quotes, the Edit Menu should appear as below:
Step 24
Save the Project as you have now finished the application, then click on Start:
When you do the following will appear:
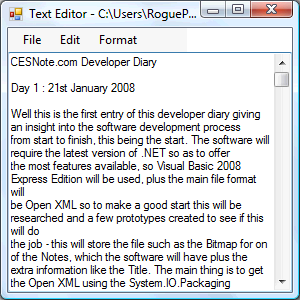
Step 25
Click on the File Menu and select Open...,this will show the Open File Dialog, then select a Text File on your Computer this should appear in the Textbox, see below:
Step 26
Click File then Exit or click on the Close button ![]() on the top right of the Text Editor to end the application.
on the top right of the Text Editor to end the application.
This Text Editor is now complete, but has one feature missing - Printing, however feel free to add this yourself, use the Menu Techniques, by adding Find & Replace, makes this Text Editor a little more useful, plus you can use the FindReplaceDialog component in other projects too!