In this tutorial you will create a Rich Text Editor using an extended version of the Rich Text Box Component to support Printing, also included Open and Save Support plus Formatting like Highlight and Bold, Italics and Underline.
Printer Friendly Download Tutorial (564KB) Download Source Code (16.1KB)
Step 1
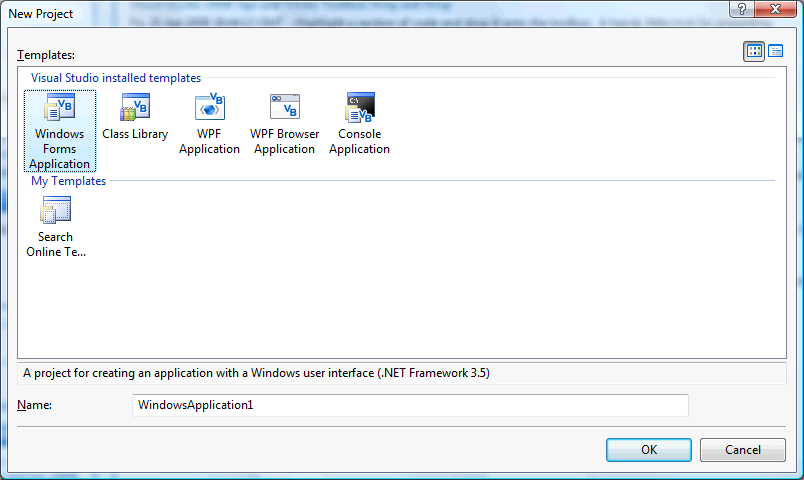
Start Microsoft Visual Basic 2008 Express Edition, then select File then New Project... Choose Windows Forms Application from the New Project Window, enter a name for the Project and then click OK, see below:
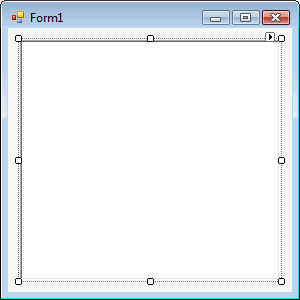
Step 2
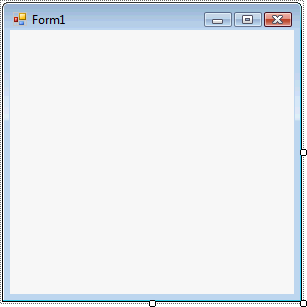
A Blank Form named Form1 should then appear, see below:
Step 3
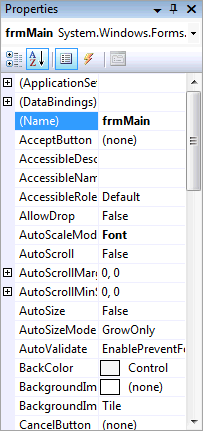
With Form1 selected goto the Properties box and change the Name from Form1 to frmMain
Step 4
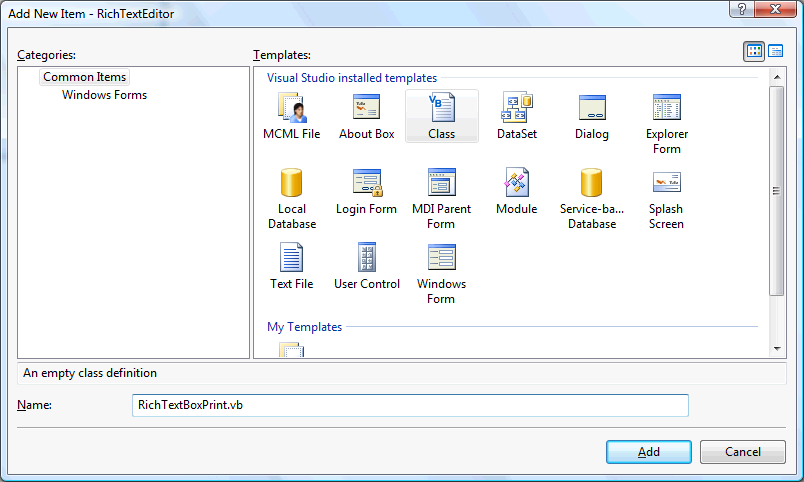
Then select Project then Add Class... and choose the "Class" Template if it is not already selected and give it the Name "RichTextBoxPrint.vb" without the quotes, see below:
Step 5
With the empty RichTextBoxPrint Class displayed, if not double click on the "RichTextBoxPrint.vb" item in Solution Explorer, then enter the following above the Public Class RichTextBoxPrint line:
Imports System.Drawing.Printing
Imports System.Runtime.InteropServices
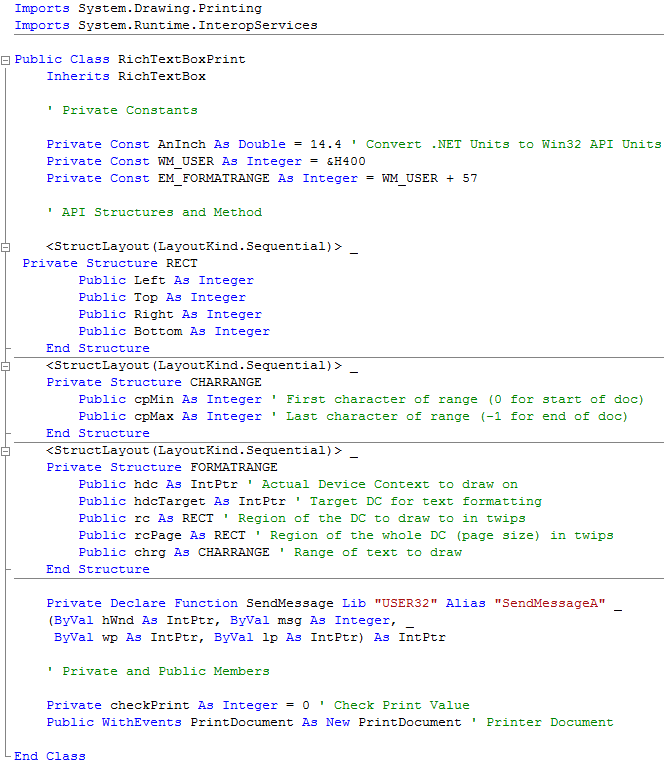
Enter the following below the Public Class RichTextBoxPrint:
Inherits RichTextBox

' Private Constants

Private Const AnInch As Double = 14.4 ' Convert .NET Units to Win32 API Units
Private Const WM_USER As Integer = &H400
Private Const EM_FORMATRANGE As Integer = WM_USER + 57

' API Structures and Method

<StructLayout(LayoutKind.Sequential)> _
Private Structure RECT
  Public Left As Integer
  Public Top As Integer
  Public Right As Integer
  Public Bottom As Integer
End Structure
<StructLayout(LayoutKind.Sequential)> _
Private Structure CHARRANGE
  Public cpMin As Integer ' First character of range (0 for start of doc)
  Public cpMax As Integer ' Last character of range (-1 for end of doc)
End Structure
<StructLayout(LayoutKind.Sequential)> _
Private Structure FORMATRANGE
  Public hdc As IntPtr ' Actual Device Context to draw on
  Public hdcTarget As IntPtr ' Target DC for text formatting
  Public rc As RECT ' Region of the DC to draw to in twips
  Public rcPage As RECT ' Region of the whole DC (page size) in twips
  Public chrg As CHARRANGE ' Range of text to draw
End Structure

Private Declare Function SendMessage Lib "USER32" Alias "SendMessageA" _
(ByVal hWnd As IntPtr, ByVal msg As Integer, _
 ByVal wp As IntPtr, ByVal lp As IntPtr) As IntPtr

' Private and Public Members

Private checkPrint As Integer = 0 ' Check Print Value
Public WithEvents PrintDocument As New PrintDocument ' Printer Document
See Below:
Step 6
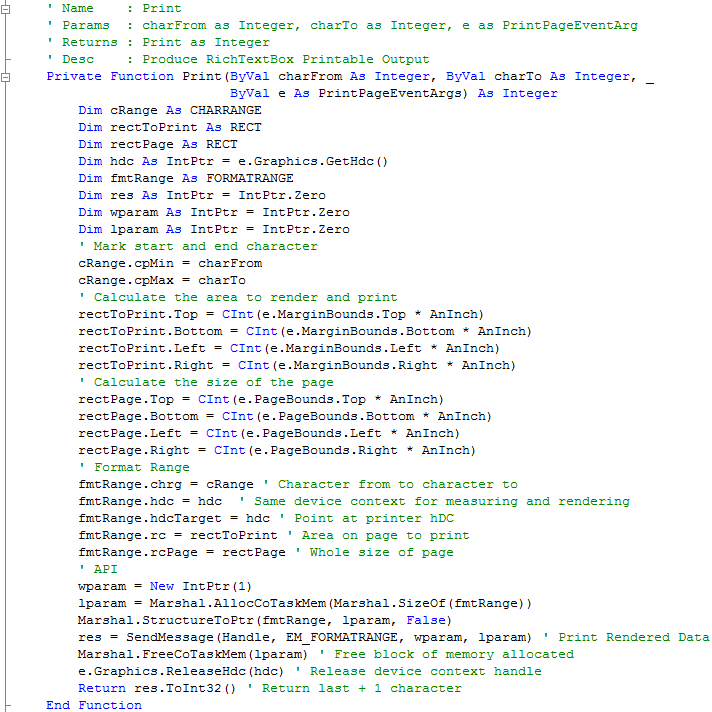
With the RichTextBoxPrint Class still displayed, enter the following Function above "End Class" and below the "Private and Public Members" Section:
' Name    : Print
' Params  : charFrom as Integer, charTo as Integer, e as PrintPageEventArg
' Returns : Print as Integer
' Desc    : Produce RichTextBox Printable Output
Private Function Print(ByVal charFrom As Integer, ByVal charTo As Integer, _
                       ByVal e As PrintPageEventArgs) As Integer
  Dim cRange As CHARRANGE
  Dim rectToPrint As RECT
  Dim rectPage As RECT
  Dim hdc As IntPtr = e.Graphics.GetHdc()
  Dim fmtRange As FORMATRANGE
  Dim res As IntPtr = IntPtr.Zero
  Dim wparam As IntPtr = IntPtr.Zero
  Dim lparam As IntPtr = IntPtr.Zero
  ' Mark start and end character
  cRange.cpMin = charFrom
  cRange.cpMax = charTo
  ' Calculate the area to render and print
  rectToPrint.Top = CInt(e.MarginBounds.Top * AnInch)
  rectToPrint.Bottom = CInt(e.MarginBounds.Bottom * AnInch)
  rectToPrint.Left = CInt(e.MarginBounds.Left * AnInch)
  rectToPrint.Right = CInt(e.MarginBounds.Right * AnInch)
  ' Calculate the size of the page
  rectPage.Top = CInt(e.PageBounds.Top * AnInch)
  rectPage.Bottom = CInt(e.PageBounds.Bottom * AnInch)
  rectPage.Left = CInt(e.PageBounds.Left * AnInch)
  rectPage.Right = CInt(e.PageBounds.Right * AnInch)
  ' Format Range
  fmtRange.chrg = cRange ' Character from to character to
  fmtRange.hdc = hdc  ' Same device context for measuring and rendering
  fmtRange.hdcTarget = hdc ' Point at printer hDC
  fmtRange.rc = rectToPrint ' Area on page to print
  fmtRange.rcPage = rectPage ' Whole size of page
  ' API
  wparam = New IntPtr(1)
  lparam = Marshal.AllocCoTaskMem(Marshal.SizeOf(fmtRange))
  Marshal.StructureToPtr(fmtRange, lparam, False)
  res = SendMessage(Handle, EM_FORMATRANGE, wparam, lparam) ' Print Rendered Data
  Marshal.FreeCoTaskMem(lparam) ' Free block of memory allocated
  e.Graphics.ReleaseHdc(hdc) ' Release device context handle
  Return res.ToInt32() ' Return last + 1 character
End Function
See Below:
Step 7
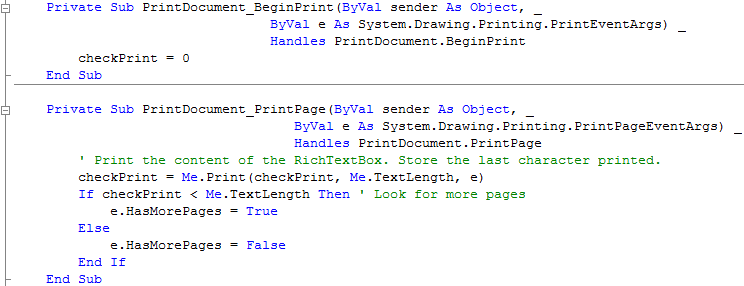
Finally in the RichTextBoxPrint Class enter the following Event handlers above "End Class" and below the Print(...) Function:
Private Sub PrintDocument_BeginPrint(ByVal sender As Object, _
                            ByVal e As System.Drawing.Printing.PrintEventArgs) _
                            Handles PrintDocument.BeginPrint
  checkPrint = 0
End Sub

Private Sub PrintDocument_PrintPage(ByVal sender As Object, _
                               ByVal e As System.Drawing.Printing.PrintPageEventArgs) _
                               Handles PrintDocument.PrintPage
  ' Print the content of the RichTextBox. Store the last character printed.
  checkPrint = Me.Print(checkPrint, Me.TextLength, e)
  If checkPrint < Me.TextLength Then ' Look for more pages
    e.HasMorePages = True
  Else
    e.HasMorePages = False
  End If
End Sub
See Below:
Step 8
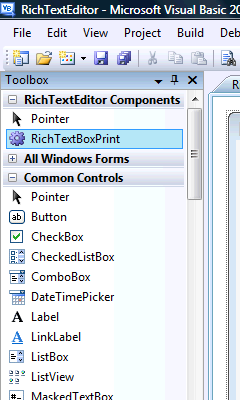
The RichTextBoxPrint Class is now Completed, to use it in the application click on Build, then "Build RichTextEditor":
You may be asked to Save your Project, when you do and the Build has completed. Select the RichTextBoxPrint Component that appears in the Toolbox under RichTextEditor Components:
Step 9
Draw the RichTextBoxPrint Component on the Form, see below:
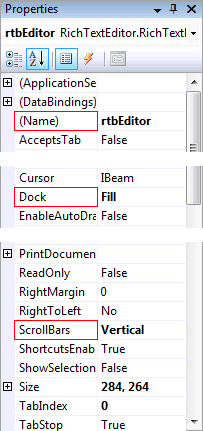
Step 10
Then goto the Properties box and change the Name to rtbEditor, Dock to Fill and Scrollbars to Vertical, see Below:
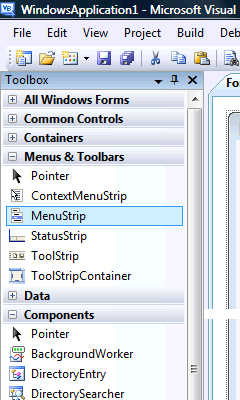
Step 11
Then from the Menus & Toolbars tab on the Toolbox select the MenuStrip Control, see Below:
Step 12
Either double-click on the MenuStrip Control entry in the Menu & Toolbars tab on the Toolbox or keep the MenuStrip Component Clicked and then move it over the Form then let go. Change the Name of the MenuStrip in the properties to mnuRichText. The Form will then look as below:

Step 13
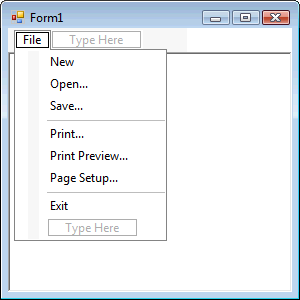
Click or select where the MenuStrip says "Type Here", an editable Textbox will appear type in "File" without the quotes in this Box, then in the Box below that type in "New", below that "Open...", then "Save...", then "-" which is minus or the hyphen key which will appear as a Seperator, then "Print...", "Print Preview..." and below that "Page Setup", then "-" again for another Seperator, and then finally "Exit". The MenuStrip should look as below:
Step 14
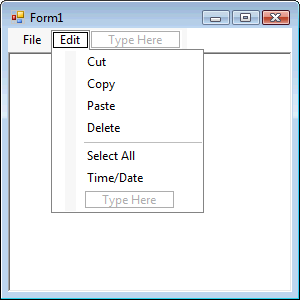
Click or select where the MenuStrip says "Type Here" next to "File", and in this type in "Edit" without the quotes in this Box, then in the Box below that type "Cut", then below that "Copy", then "Paste" and "Delete", type in "-" which is minus or the hyphen key for a Seperator, then below that "Select All" and finally "Time/Date". The MenuStrip should look as below:
Step 15
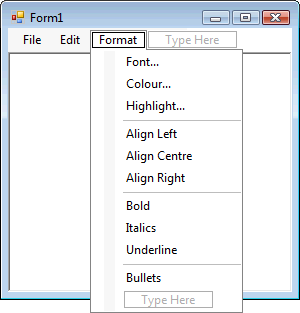
Click on or select the MenuStrip again, on this next to the Edit menu will be another "Type Here" option this this box type "Format" without the quotes, then in the "Type Here" box under that type "Font...", then below that "Colour...", then "Highlight", then type "-" which is minus or the hyphen key for a Seperator, then "Align Left", below that "Align Centre", then "Align Right", then "-" again for a Seperator, then below that type "Bold", then "Italics", then "Underline", then "-" for another Seperator and finally "Bullets", see below:
Step 16
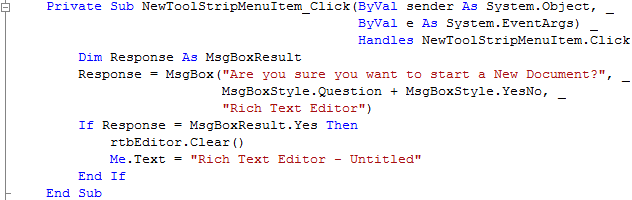
Click on "File" on the MenuStrip to show the MenuStrip then Double Click on the Menu Item Labeled "New" (NewToolStripMenuItem) and type the following in the NewToolStripMenuItem_Click() Sub:
Dim Response As MsgBoxResult
Response = MsgBox("Are you sure you want to start a New Document?", _
                  MsgBoxStyle.Question + MsgBoxStyle.YesNo, _
                  "Rich Text Editor")
If Response = MsgBoxResult.Yes Then
    rtbEditor.Clear()
    Me.Text = "Rich Text Text Editor - Untitled"
End If
See Below:
Step 17
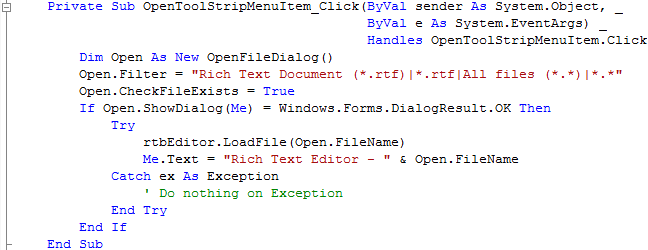
Click on the [Design] Tab to view the form again, then Click on "File" on the MenuStrip to show the MenuStrip then Double Click on the Menu Item Labeled "Open..." (OpenToolStripMenuItem) and type the following in the OpenToolStripMenuItem_Click() Sub:
Dim Open As New OpenFileDialog()
Open.Filter = "Rich Text Document (*.rtf)|*.rtf|All files (*.*)|*.*"
Open.CheckFileExists = True
If Open.ShowDialog(Me) = Windows.Forms.DialogResult.OK Then
    Try
        rtbEditor.LoadFile(Open.FileName)
        Me.Text = "Rich Text Editor - " & Open.FileName
    Catch ex As Exception
        ' Do nothing on Exception
    End Try
End If
See Below:
Step 18
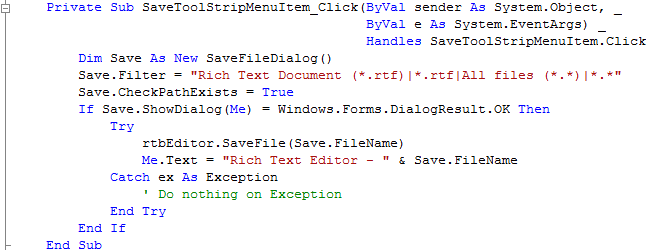
Click on the [Design] Tab to view the form again, then Click on "File" on the MenuStrip to show the MenuStrip then Double Click on the Menu Item Labeled "Save..." (SaveToolStripMenuItem) and type the following in the SaveToolStripMenuItem_Click() Sub:
Dim Save As New SaveFileDialog()
Save.Filter = "Rich Text Document (*.rtf)|*.rtf|All files (*.*)|*.*"
Save.CheckPathExists = True
If Save.ShowDialog(Me) = Windows.Forms.DialogResult.OK Then
    Try
        rtbEditor.SaveFile(Save.FileName)
        Me.Text = "Rich Text Editor - " & Save.FileName
    Catch ex As Exception
        ' Do nothing on Exception
    End Try
End If
See Below:
Step 19
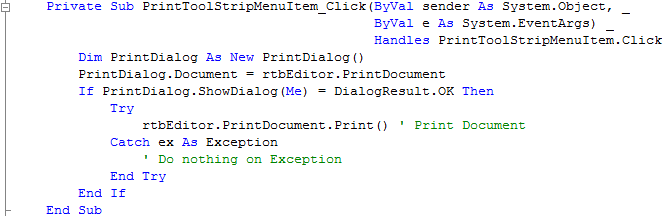
Click on the [Design] Tab to view the form again, then Click on "File" on the MenuStrip to show the MenuStrip then Double Click on the Menu Item Labeled "Print..." (PrintToolStripMenuItem) and type the following in the PrintToolStripMenuItem_Click() Sub:
Dim PrintDialog As New PrintDialog()
PrintDialog.Document = rtbEditor.PrintDocument
If PrintDialog.ShowDialog(Me) = DialogResult.OK Then
    Try
        rtbEditor.PrintDocument.Print() ' Print Document
    Catch ex As Exception
        ' Do nothing on Exception
    End Try
End If
See Below:
Step 20
Click on the [Design] Tab to view the form again, then Click on "File" on the MenuStrip to show the MenuStrip then Double Click on the Menu Item Labeled "Print Preview..." (PrintPreviewToolStripMenuItem) and type the following in the PrintPreviewToolStripMenuItem_Click() Sub:
Dim PrintPreview As New PrintPreviewDialog()
PrintPreview.Document = rtbEditor.PrintDocument
PrintPreview.ShowDialog(Me)
See Below:

Step 21
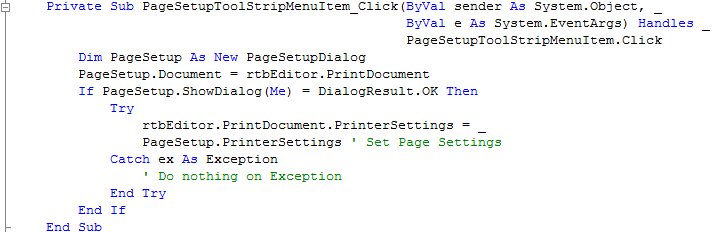
Click on the [Design] Tab to view the form again, then Click on "File" on the MenuStrip to show the MenuStrip then Double Click on the Menu Item Labeled "Page Setup..." (PageSetupToolStripMenuItem) and type the following in the PageSetupToolStripMenuItem_Click() Sub:
Dim PageSetup As New PageSetupDialog
PageSetup.Document = rtbEditor.PrintDocument
If PageSetup.ShowDialog(Me) = DialogResult.OK Then
    Try
        rtbEditor.PrintDocument.PrinterSettings = _
        PageSetup.PrinterSettings ' Set Page Settings
    Catch ex As Exception
        ' Do nothing on Exception
    End Try
End If
See Below:
Step 22
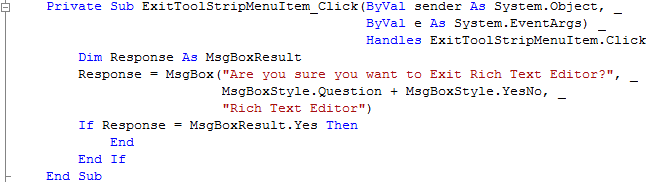
Click on the [Design] Tab to view the form again, then Click on "File" on the MenuStrip to show the MenuStrip then Double Click on the Menu Item Labeled "Exit" (ExitToolStripMenuItem) and type the following in the ExitToolStripMenuItem_Click() Sub
        Dim Response As MsgBoxResult
        Response = MsgBox("Are you sure you want to Exit Rich Text Editor?", _
                          MsgBoxStyle.Question + MsgBoxStyle.YesNo, _
                          "Rich Text Editor")
        If Response = MsgBoxResult.Yes Then
            End
        End If
See Below:
Step 23
Click on the [Design] Tab to view the form again, then Click on "Edit" on the MenuStrip, then Double Click on the Menu Item Labeled "Cut" (CutToolStripMenuItem) and type the following in the CutToolStripMenuItem_Click() Sub:
rtbEditor.Cut()
Click on [Design] tab or double click on the frmMain entry in Solution Explorer again, click "Edit", then Double Click on the Menu Item Labeled "Copy" (CopyToolStripMenuItem) and type the following in the CopyToolStripMenuItem_Click() Sub:
rtbEditor.Copy()
Click on [Design] tab or double click on the frmMain entry in Solution Explorer again, click "Edit", then Double Click on the Menu Item Labeled "Paste" (PasteToolStripMenuItem) and type the following in the PasteToolStripMenuItem_Click() Sub:
rtbEditor.Paste()
Click on [Design] tab or double click on the frmMain entry in Solution Explorer again, click "Edit", then Double Click on the Menu Item Labeled "Delete" (DeleteToolStripMenuItem) and type the following in the DeleteToolStripMenuItem_Click() Sub:
rtbEditor.SelectedText = ""
See Below:

Step 24
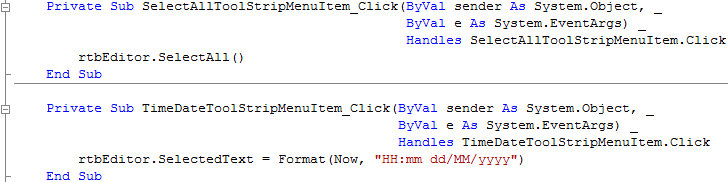
Click on the [Design] Tab to view the form again, then Click on "Edit" on the MenuStrip, then Double Click on the Menu Item Labeled "Select All" (SelectAllToolStripMenuItem) and type the following in the SelectAllToolStripMenuItem_Click() Sub:
rtbEditor.SelectAll()
Click on [Design] tab or double click on the frmMain entry in Solution Explorer again, click "Edit", then Double Click on the Menu Item Labeled "Time/Date" (TimeDateToolStripMenuItem) and type the following in the TimeDateToolStripMenuItem_Click() Sub:
rtbEditor.SelectedText = Format(Now, "HH:mm dd/MM/yyyy")
See Below:
Step 25
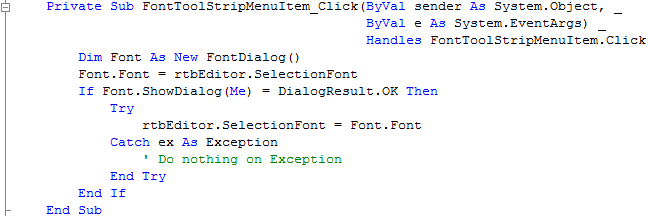
Click on the [Design] Tab to view the form again, then Click on "Format" on the MenuStrip, then Double Click on the Menu Item Labeled "Font..." (FontToolStripMenuItem) and type the following in the FontToolStripMenuItem_Click() Sub
Dim Font As New FontDialog()
Font.Font = rtbEditor.SelectionFont
If Font.ShowDialog(Me) = DialogResult.OK Then
    Try
        rtbEditor.SelectionFont = Font.Font
    Catch ex As Exception
        ' Do nothing on Exception
    End Try
End If
See Below:
Step 26
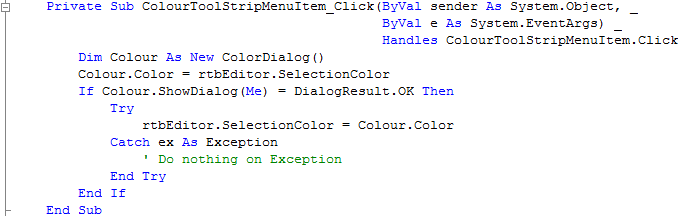
Click on the [Design] Tab to view the form again, then Click on "Format" on the MenuStrip, then Double Click on the Menu Item Labeled "Colour..." (ColourToolStripMenuItem) and type the following in the ColourToolStripMenuItem_Click() Sub
Dim Colour As New ColorDialog()
Colour.Color = rtbEditor.SelectionColor
If Colour.ShowDialog(Me) = DialogResult.OK Then
    Try
        rtbEditor.SelectionColor = Colour.Color
    Catch ex As Exception
        ' Do nothing on Exception
    End Try
End If
See Below:
Step 27
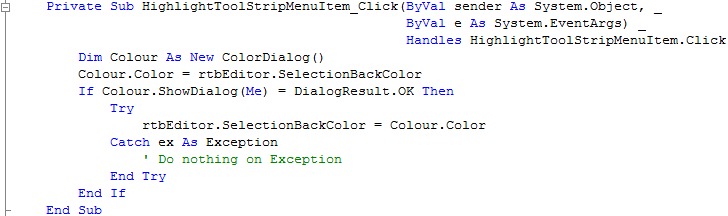
Click on the [Design] Tab to view the form again, then Click on "Format" on the MenuStrip, then Double Click on the Menu Item Labeled "Highlight..." (HighlightToolStripMenuItem) and type the following in the HighlightToolStripMenuItem_Click() Sub
Dim Colour As New ColorDialog()
Colour.Color = rtbEditor.SelectionBackColor
If Colour.ShowDialog(Me) = DialogResult.OK Then
    Try
        rtbEditor.SelectionBackColor = Colour.Color
    Catch ex As Exception
        ' Do nothing on Exception
    End Try
End If
See Below:
Step 28
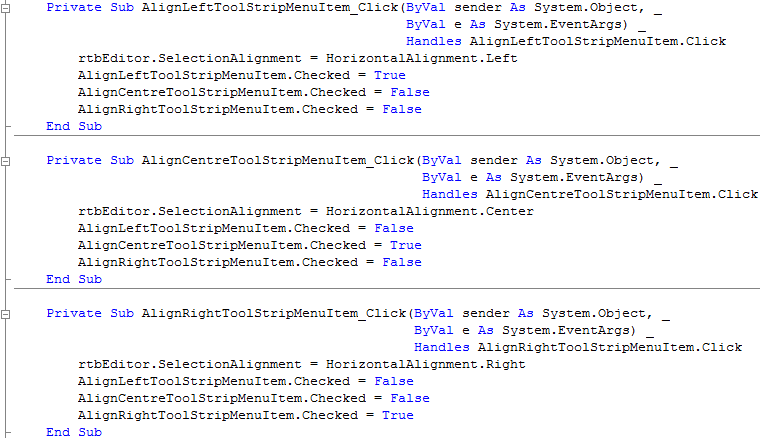
Click on the [Design] Tab to view the form again, then Click on "Format" on the MenuStrip, then Double Click on the Menu Item Labeled "Align Left" (AlignLeftToolStripMenuItem) and type the following in the AlignLeftToolStripMenuItem_Click() Sub:
rtbEditor.SelectionAlignment = HorizontalAlignment.Left
AlignLeftToolStripMenuItem.Checked = True
AlignCentreToolStripMenuItem.Checked = False
AlignRightToolStripMenuItem.Checked = False
Click on [Design] tab or double click on the frmMain entry in Solution Explorer again, click "Format", then Double Click on the Menu Item Labeled "Align Centre" (AlignCentreToolStripMenuItem) and type the following in the AlignCentreToolStripMenuItem_Click() Sub:
rtbEditor.SelectionAlignment = HorizontalAlignment.Center
AlignLeftToolStripMenuItem.Checked = False
AlignCentreToolStripMenuItem.Checked = True
AlignRightToolStripMenuItem.Checked = False
Click on [Design] tab or double click on the frmMain entry in Solution Explorer again, click "Format", then Double Click on the Menu Item Labeled "Align Right" (AlignRightToolStripMenuItem) and type the following in the AlignRightToolStripMenuItem_Click() Sub:
rtbEditor.SelectionAlignment = HorizontalAlignment.Right
AlignLeftToolStripMenuItem.Checked = False
AlignCentreToolStripMenuItem.Checked = False
AlignRightToolStripMenuItem.Checked = True
See Below:
Step 29
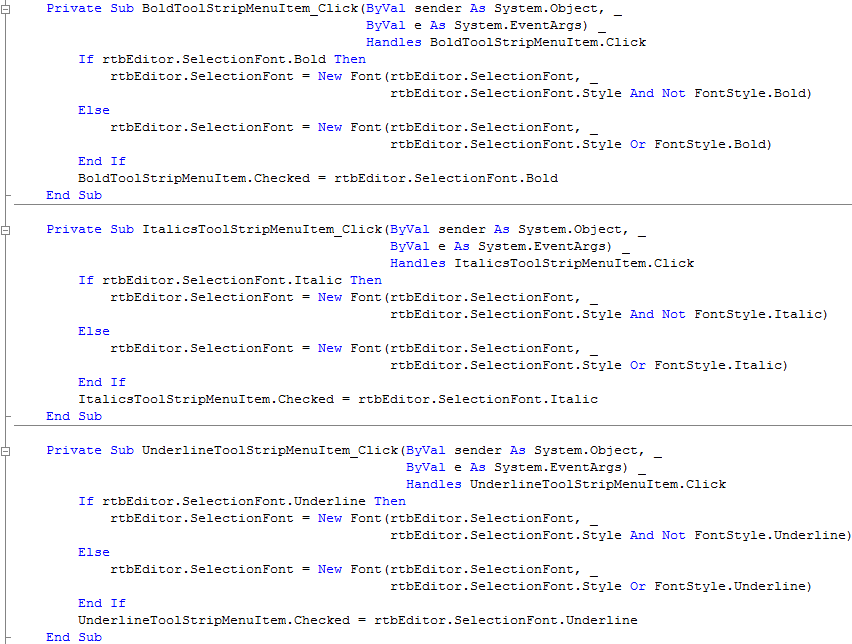
Click on the [Design] Tab to view the form again, then Click on "Format" on the MenuStrip, then Double Click on the Menu Item Labeled "Bold" (BoldToolStripMenuItem) and type the following in the BoldToolStripMenuItem_Click() Sub:
If rtbEditor.SelectionFont.Bold Then
  rtbEditor.SelectionFont = New Font(rtbEditor.SelectionFont, _
                                     rtbEditor.SelectionFont.Style And Not FontStyle.Bold)
Else
  rtbEditor.SelectionFont = New Font(rtbEditor.SelectionFont, _
                                     rtbEditor.SelectionFont.Style Or FontStyle.Bold)
End If
BoldToolStripMenuItem.Checked = rtbEditor.SelectionFont.Bold
Click on [Design] tab or double click on the frmMain entry in Solution Explorer again, click "Format", then Double Click on the Menu Item Labeled "Italics" (ItalicsToolStripMenuItem) and type the following in the ItalicsToolStripMenuItem_Click() Sub:
If rtbEditor.SelectionFont.Italic Then
  rtbEditor.SelectionFont = New Font(rtbEditor.SelectionFont, _
                                     rtbEditor.SelectionFont.Style And Not FontStyle.Italic)
Else
  rtbEditor.SelectionFont = New Font(rtbEditor.SelectionFont, _
                                     rtbEditor.SelectionFont.Style Or FontStyle.Italic)
End If
ItalicsToolStripMenuItem.Checked = rtbEditor.SelectionFont.Italic
Click on [Design] tab or double click on the frmMain entry in Solution Explorer again, click "Format", then Double Click on the Menu Item Labeled "Underline" (UnderlineToolStripMenuItem) and type the following in the UnderlineToolStripMenuItem_Click() Sub:
If rtbEditor.SelectionFont.Underline Then
  rtbEditor.SelectionFont = New Font(rtbEditor.SelectionFont, _
                                     rtbEditor.SelectionFont.Style And Not FontStyle.Underline)
Else
  rtbEditor.SelectionFont = New Font(rtbEditor.SelectionFont, _
                                     rtbEditor.SelectionFont.Style Or FontStyle.Underline)
End If
UnderlineToolStripMenuItem.Checked = rtbEditor.SelectionFont.Underline
See Below:
Step 30
Click on the [Design] Tab to view the form again, then Click on "Format" on the MenuStrip, then Double Click on the Menu Item Labeled "Bullets" (BulletsToolStripMenuItem) and type the following in the BulletsToolStripMenuItem_Click() Sub
rtbEditor.SelectionBullet = Not rtbEditor.SelectionBullet
BulletsToolStripMenuItem.Checked = rtbEditor.SelectionBullet
See Below:

Step 31
Click on the [Design] Tab to view the form again, then Double Click on the Form (frmMain) and type the following in the frmMain_Load() Sub
AlignLeftToolStripMenuItem.Checked = True
Me.Text = "Rich Text Editor - Untitled"
See Below:

Step 30
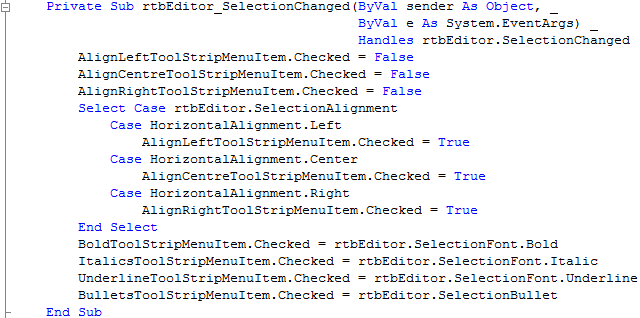
While Still in the Code View, if not double click on the Form pr the Window Area of the Form. There should be two Drop-down boxes one labeled (frmMain Events) or (General) and the other is Load or (Declarations). Click on the drop-down box with "(frmMain Events)" in it and select "rtbEditor", then from the other list, select the "SelectionChanged" event from the list of events for rtbEditor, and type in rtbEditor_SelectionChanged() Sub
AlignLeftToolStripMenuItem.Checked = False
AlignCentreToolStripMenuItem.Checked = False
AlignRightToolStripMenuItem.Checked = False
Select Case rtbEditor.SelectionAlignment
  Case HorizontalAlignment.Left
    AlignLeftToolStripMenuItem.Checked = True
  Case HorizontalAlignment.Center
    AlignCentreToolStripMenuItem.Checked = True
  Case HorizontalAlignment.Right
    AlignRightToolStripMenuItem.Checked = True
End Select
BoldToolStripMenuItem.Checked = rtbEditor.SelectionFont.Bold
ItalicsToolStripMenuItem.Checked = rtbEditor.SelectionFont.Italic
UnderlineToolStripMenuItem.Checked = rtbEditor.SelectionFont.Underline
BulletsToolStripMenuItem.Checked = rtbEditor.SelectionBullet
See Below:
Step 31
Steps 31-34 are optional and just add Keyboard Shortcuts to the MenuItems, you don't have to do these if you don't want to!
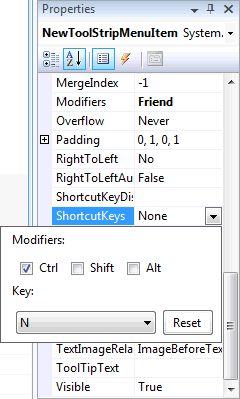
Click on the [Design] Tab to view the form again, click on "New" on the MenuStrip then in the Properties box look for the "ShortcutKeys" option and
click on the Drop Down arrow where "None" appears. Check the "Ctrl" Checkbox in "Modifiers" and then in the "Key" dropdown list select "N",
see below:
Step 32
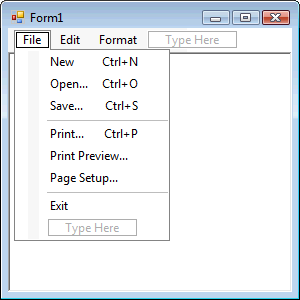
Set the rest of the "File" MenuItem "ShortcutKeys" Properties except the "Exit" Menu Item, "Open" should be set to "Ctrl+O", "Save" to "Ctrl+S" and "Print" to "Ctrl+P", the File Menu should appear as below:
Step 33
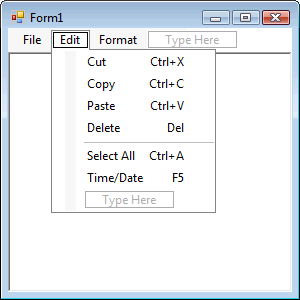
Click on or select the "Edit" Menu and set the "ShortcutKeys" Properties, "Cut" should be set to "Ctrl+X", "Copy" to "Ctrl+C", "Paste" to "Ctrl+V", "Delete" should be just "Del" in the Keys drop-down list, "Select All" should be "Ctrl+A", "Time/Date" should be just "F5" from the Keys drop-down list. The Edit Menu should appear as below:
Step 34
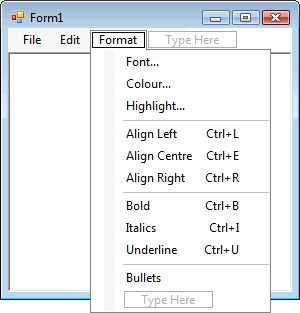
Click on or select the "Format" Menu, select "Align Left" and in the "ShortcutKeys" property type "Ctrl+L", select "Align Centre" and type "Ctrl+E" in the "ShortcutKeys" property, "Align Right" should be set to "Ctrl+R". "Bold" to "Ctrl+B", "Italics" to "Ctrl+I" and "Underline" set to "Ctrl+U" The Format Menu should appear as below:
Step 35
Save the Project as you have now finished the application, then click on Start:
When you do the following will appear:
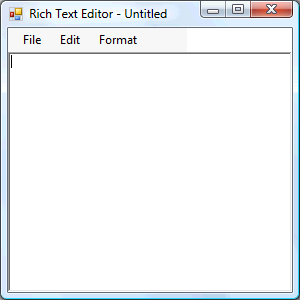
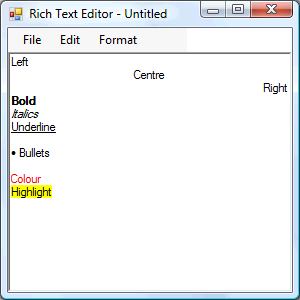
Step 36
You can create your own Rich Text Documents or Open an existing one to edit, see below:
Step 37
Click File then Exit or click on the Close button ![]() on the top right of the Rich Text Editor to end the application.
on the top right of the Rich Text Editor to end the application.
This program uses an extended verison of the standard Rich Text Box to enable Printing, you can use the normal Rich Text Box instead and remove the Printing functions if you wish. This application has all the main features of a Rich Text Editor, see if you can add more!
![]()